Why Lerna and Yarn Workspaces is a Perfect Match for Building Mono-Repos – A Close Look at Features and Performance
This post is my take on the topic of Mono-Repo. After a brief introduction to Mono-Repos and a comparison with Multi-Repos, I go into tools for establishing Mono-Repos.
I don’t want to assess in great detail what repository type is better in which circumstance. However, the goal of this article is all about Mono-Repos and how lerna, npm, and yarn (workspaces) can help. It also makes sense to use these tools in combination. Especially lerna and yarn workspaces can peacefully coexist in a project. How? We will find out in a minute.
What is a Mono-Repo? How does it Compare to Multi-Repo?
Tools like lerna and yarn workspaces have been a decisive factor with the result that managing your codebase in a single repo (a.k.a. Mono-Repo) has gained some traction for about one or two years. A lot of articles were written or conference talks were given about this topic.
In short, a so-called Mono-Repo is a (git) repository that houses multiple projects. Such projects are called workspaces or packages. In contrast, using multiple repositories with each repository housing only one project is called a Multi-Repo approach. Of course, a combination of both approaches is possible. In my current job, we constitute multiple teams where each team has its own repositories. There are teams that pursue a Multi-Repo approach and there are teams believing in a Multi-Repo maxim. Plus, there exist teams leveraging both approaches because the technology, which is part of the repository, is also a factor to have in mind for decision-making (e.g., every Java micro-service is part of an own git repo).
To find out about differences along with pros and cons of Mono-Repos and Multi-Repos, I recommend Markus Oberlehner’s article about Monorepos in the Wild.
Tool Landscape for Mono-Repos
A Mono-Repo hosts one or more projects or packages. These packages are "Mini-Repos" that can be versioned, built, and published independently. Therefore, every package contains its own package.json file due to the fact that every package is a full-fledged project on its own. Packages might have dependency relations between each other. Managing these dependencies are implemented by symlinks.
As we see later, lerna and yarn workspaces give us the ability to build libraries and apps in a single repo without forcing us to publish to npm or other registries. The beauty behind these technologies is that they can find package dependencies by analyzing package.json files located at each project’s root folder. Thereby, these tools make it obsolete to manually create symlinks or use "low-level" npm link directly.
This results in faster code-test-debug cycles by sharing components locally. lerna and yarn workspaces together improve the developer experience of managing multiple packages in a Mono-Repo.
Correlation between npm, yarn, yarn workspaces, and lerna
I want to shed some light on the clutter how npm, yarn, yarn workspaces, and lerna are involved in the topic of Mono-repos. Take a look at the following "set diagram".

It depicts three main players and how they correlate. By the way, do not take the proportions too seriously. The diagram’s purpose is just to give an impression how things are connected.
npm (marked by 1) and yarn (2) are both native package managers that have many features in common (3). As an example, both leverage the concept of package.json as container for dependency management, which was introduced by npm back in the days. More shared concepts and features are dependency management, publishing, or using lock files to "freeze" dependency versions. There are even more features originated by npm that are also leveraged by yarn, such as publishing to npm registry.
One of the reasons for creating yarn in the first place was performance – it took too long to install dependencies in large projects with npm. Another aspect was missing features, such as a sophisticated concept for freezing versions, offline capabilities, or deterministic behavior in terms of dependency resolution. Though, many of these gaps of npm have vanished over the time and both technologies are more and more feature-compliant nowadays.
Things that still belong solely to npm (1) or yarn (2) are package-lock.json files or yarn.lock files, respectively. However, for us, the application developers, the different implementation of lock files does not really matter. Practically, npm and yarn are even on how version management is handled.
One big feature that is exclusive to yarn is yarn workspaces (4) that was added to yarn about a year ago. It expands yarn by native Mono-Repo capabilities. The next section goes more into Mono-Repo features.
Mono-Repo – What is native? What is user land?
Consider the next diagram depicting how technologies in the Mono-Repo environment are connected to each other.
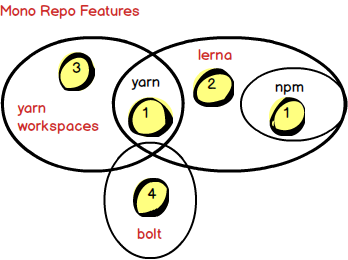
Marked in red are technologies that provide Mono-Repo capabilities. All of them are based either on npm or yarn. The latter do not provide advanced features for building Mono-Repose besides npm link or yarn link, respectively.
yarn workspaces is the only representative that exposes Mono-Repo capabilities natively. lerna is around for quite some time and came out even before yarn workspaces has existed. lerna provides Mono-Repo features on the level of user land with the help of npm or yarn as dependency management tools.
lerna leverages semantic links for this purpose. It also allows for using yarn workspaces and, then, leaves the whole Mono-Repo aspect solely to the natively implemented features of yarn workspaces. Furthermore, lerna provides sophisticated publishing and version management features to even publish projects independently from each other. Short, lerna offers many features beyond Mono-Repo management. On the other side, yarn workspaces sole purpose is to ease the Mono-Repo workflow. So, you do not have to decide for either side of them. It totally does make sense to use lerna with yarn workspaces.
bolt is a relatively new project that bases on yarn workspaces. Inspired by lerna, its goal is to add more helpful commands on this foundation. However, I do not have any experience with it since I haven’t accomplished yet to get bolt up and running in my playground project. In addition, I have realized that there have been relatively few commits lately. So, I do not go any deeper in this article.
Different Variants of Configuring Mono-Repos
This section’s goal is to give a quick overview on how to set up the different tools in different variations. You can understand the screenshots as a kind of "cheat sheets". The focus is on the configuration part of the different approaches and how they differ.
I created a small repository to demonstrate the different variants. Just clone the demo project repo and switch branches for the different variants. The README.md file describes how to bootstrap and use (i.e., build and run the dummy app) the particular variant. Another goal of this section and demo project is to provide an easy playground to see the different variants in action from different perspectives: which configuration steps are required, what steps are needed to build and use the sub projects (i.e., packages), how does dependency management work, or what are the timing implications for bootstrapping.
1. Do it yourself
I skip this section but feel free to checkout branch 1-do-it-yourself. Basically you work with npm link and have to create semantic links and install all sub projects manually. I hope you can imagine how tedious and impractical this scenario is for real-world projects.
2. lerna with npm
To get support for automating such manual tasks of approach 1, lerna was introduced. You need a lerna.json file in the root folder. As a convention, lerna uses npm as default.
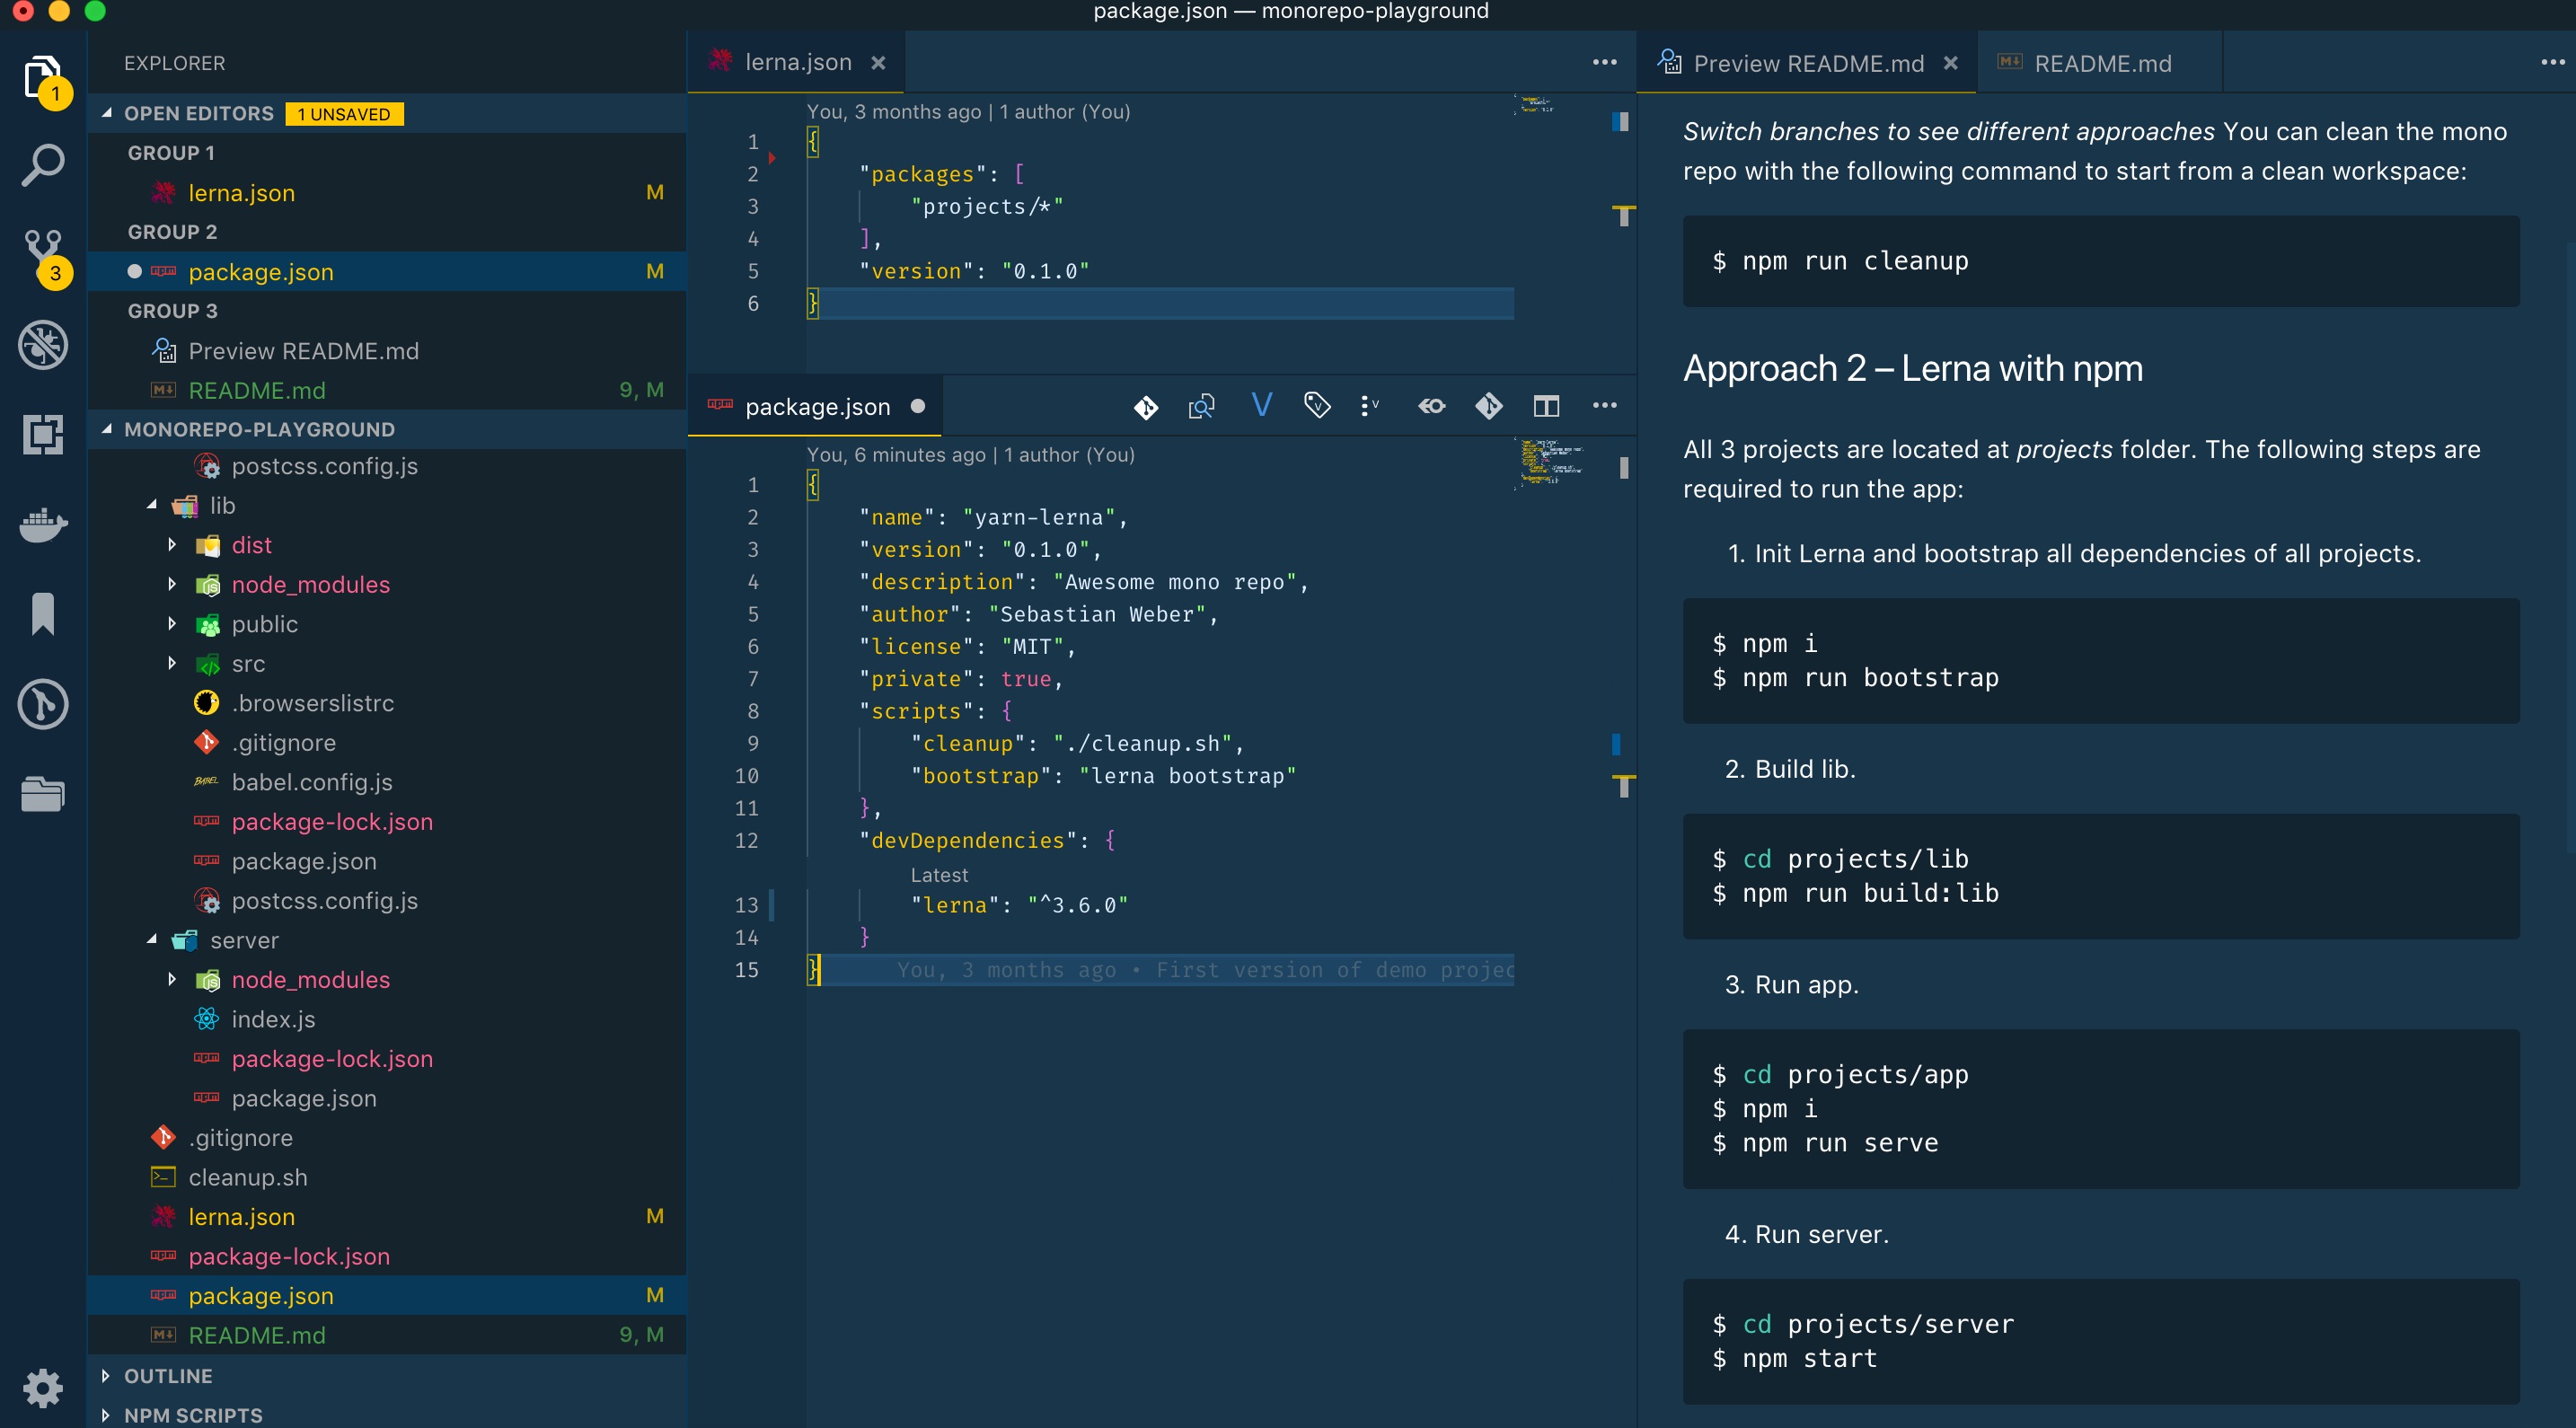
As you see in the next screenshot, you basically need to edit two files for getting lerna up and running: lerna.json and package.json. Within lerna.json you need to specify where lerna has to look for packages.
To bootstrap all sub projects you need to execute lerna bootstrap by invoking the following npm script:
$ npm run bootstrap
What this command basically does is to go into all packages’ root folders and execute npm install. Take a look at the three packages and you will see that lerna caused npm to create a node_modules folder for every package.
3. lerna with yarn
This is the same setup as approach 2. The only difference is that you have to specify yarn as client with the "npmClient" property in lerna.json file. Bootstrapping is also performed by lerna.
What is the difference in contrast to approach 1? Virtually nothing. Mainly it is a matter of taste because the only difference is whether lerna utilizes npm or yarn as dependency manager. The answer to the question, which one to chose boils down to the following questions:
- which syntax do I prefer? npm run <command> vs _yarn <command>
- Should I stick to the quasi-standard or do I like the effort of Facebook
- Do I really care about bootstrapping time? If so, take a look at the next chapter which provides some performance benchmarks.
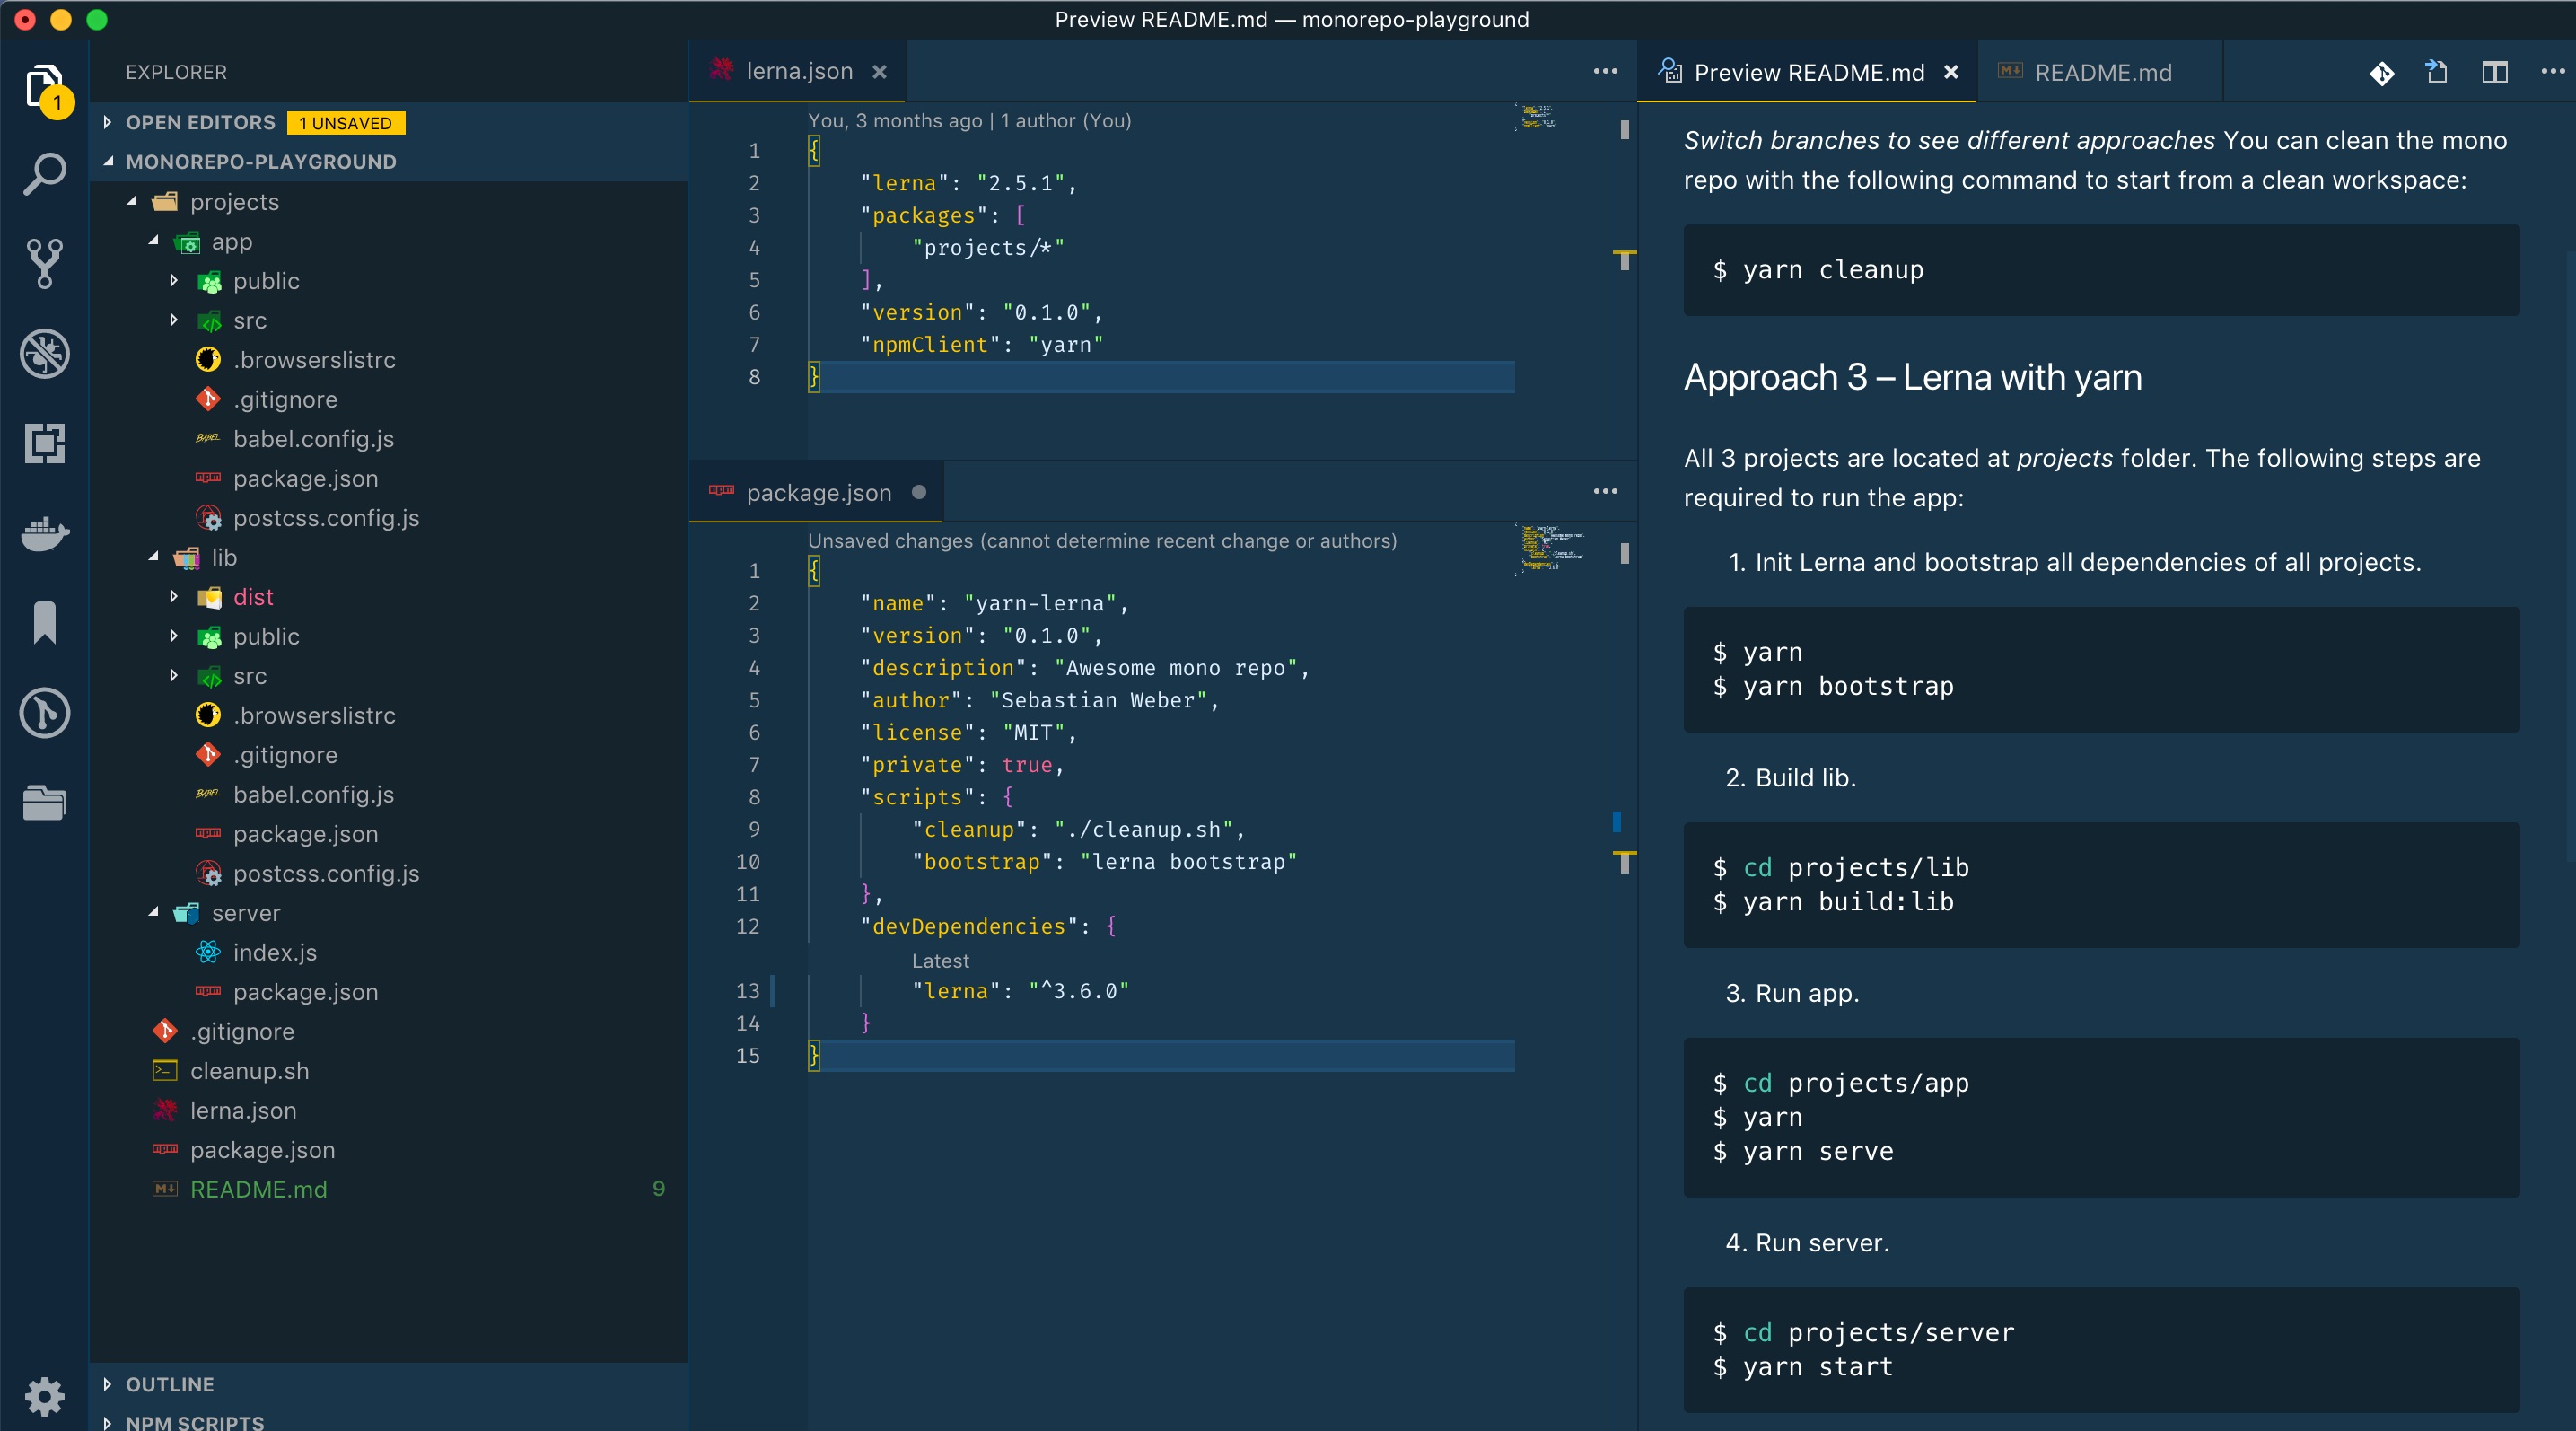
4. yarn workspaces
For this approach, you do not require lerna. yarn workspaces come with built-in Mono-Repo capabilities. To use yarn workspaces you need yarn version 1.0 or higher. As you can see in the following screenshot, you do not need a dedicated configuration file. The package.json file in the root folder needs to be private and has to have a "workspaces" property telling yarn where to find the sub projects (or workspaces in yarn speech).
To bootstrap the project with all its workspaces, you just use yarn since yarn workspaces provides this feature natively:
$ yarn install
or short:
$ yarn
This combines both steps of approach 1 and 2: Installing the dependencies of the root folder and bootstrapping of all packages’ dependencies.
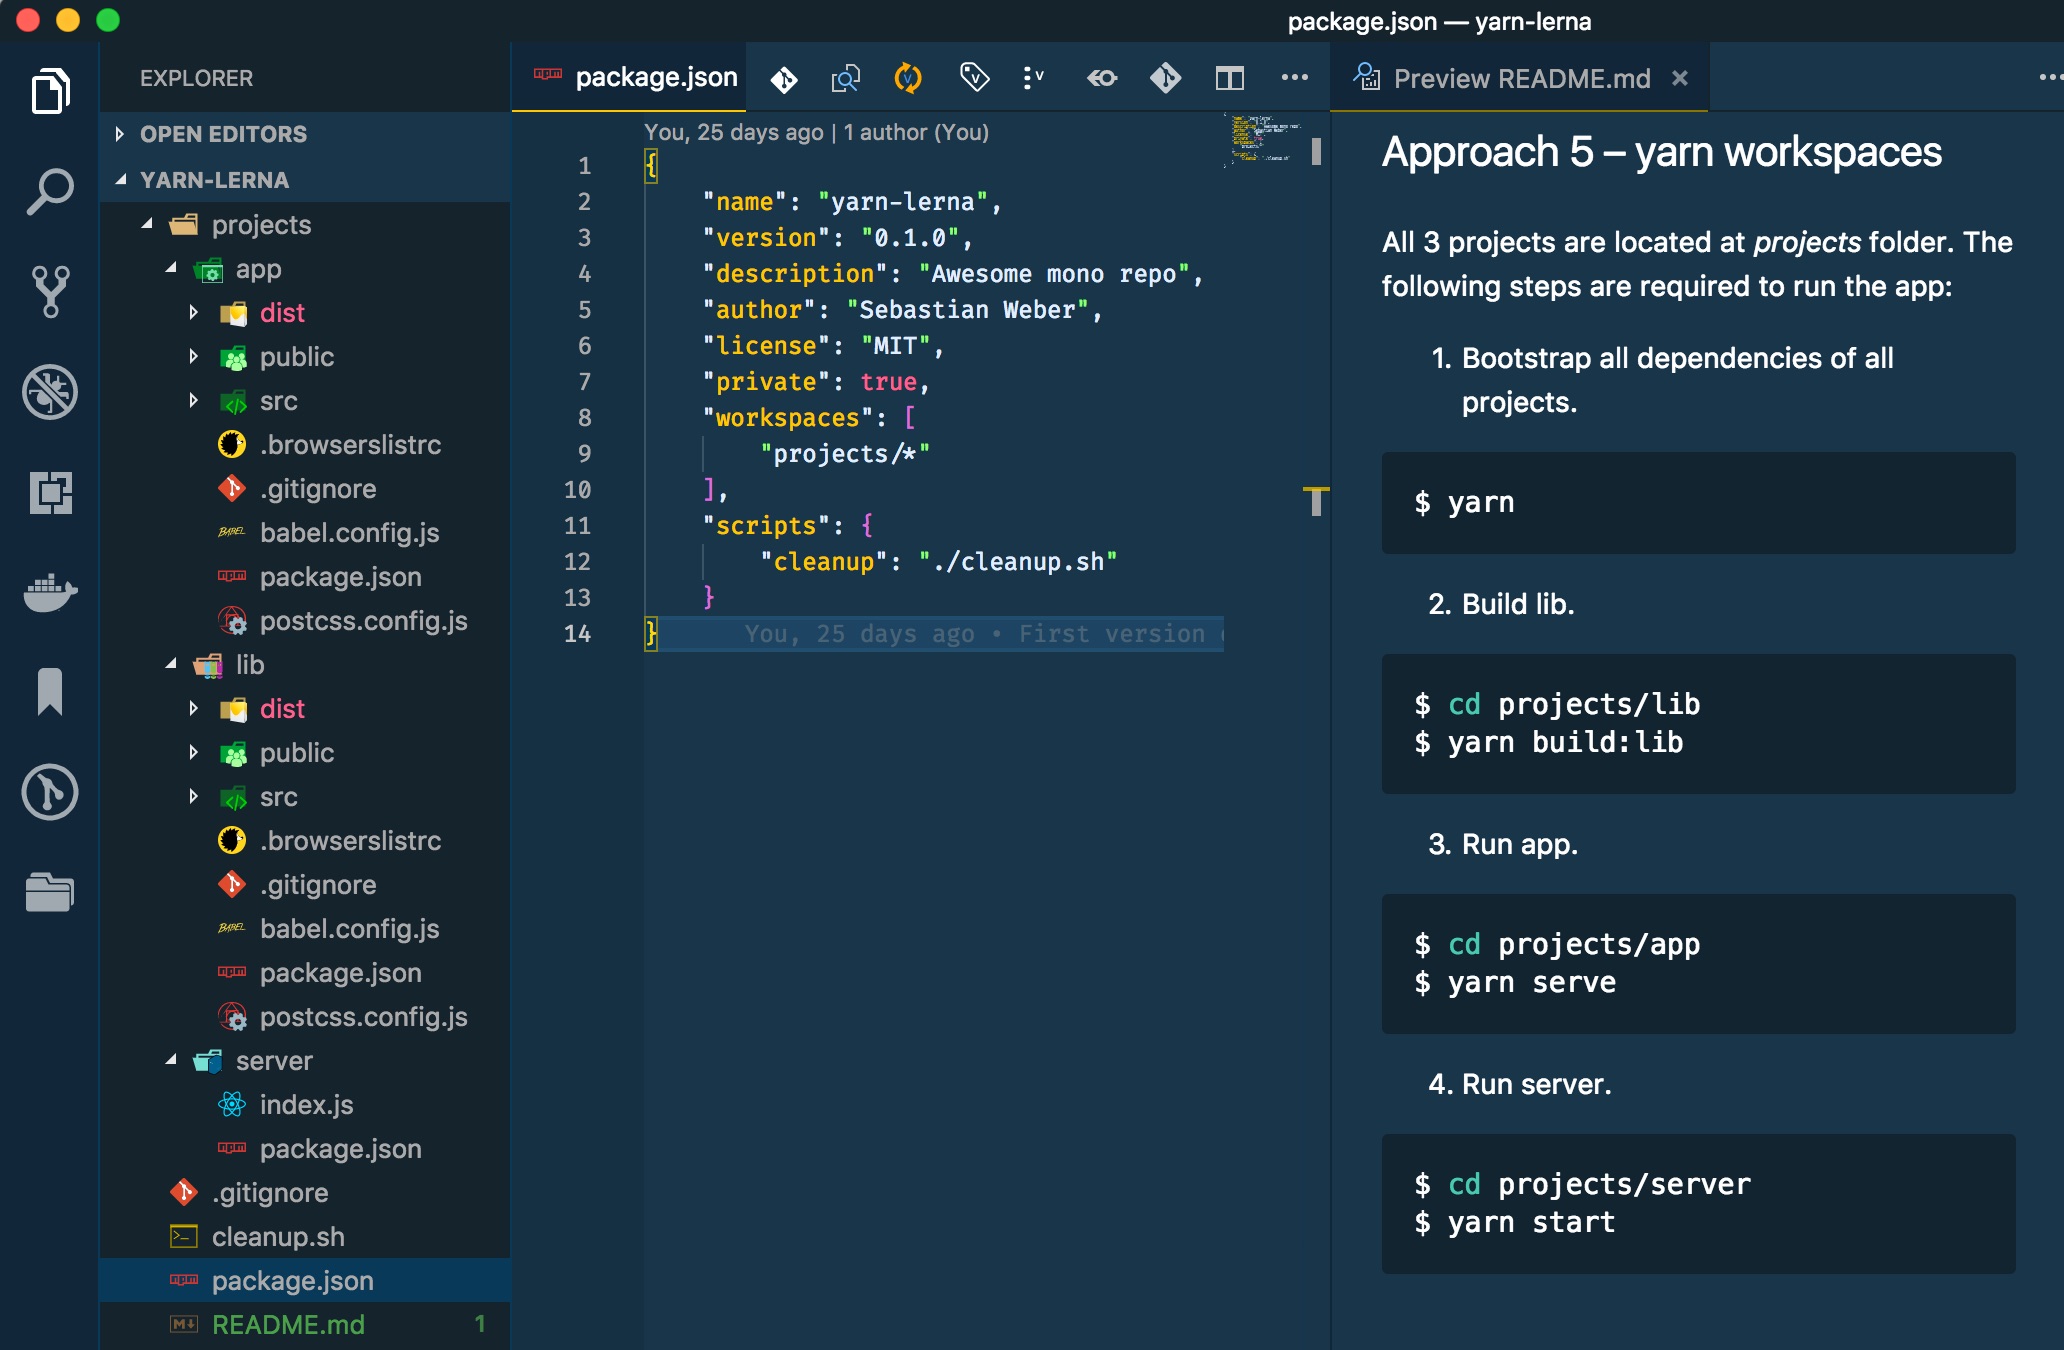
One big difference in comparison to approach 1 and 2 is that yarn workspaces creates only one node_modules folder. All dependencies are hoisted to the root folder. Remark: Meanwhile, this behavior is also possible with lerna (without yarn workspaces) by using the –hoist flag.
5. lerna with yarn workspaces
To configure lerna with yarn workspaces you have to have the same configuration in the root’s package.json as described in approach 4. However, you need to provide a lerna.json file in the root folder, too. There, you need to tell lerna to use yarn workspaces. Unfortunately, you have to specify the location of the sub projects redundantly in lerna.json. To bootstrap the project, no lerna bootstrap is required, you just have to use yarn install as described in approach 4. It doesn’t make much sense to invoke lerna bootstrap since it just calls yarn install itself.
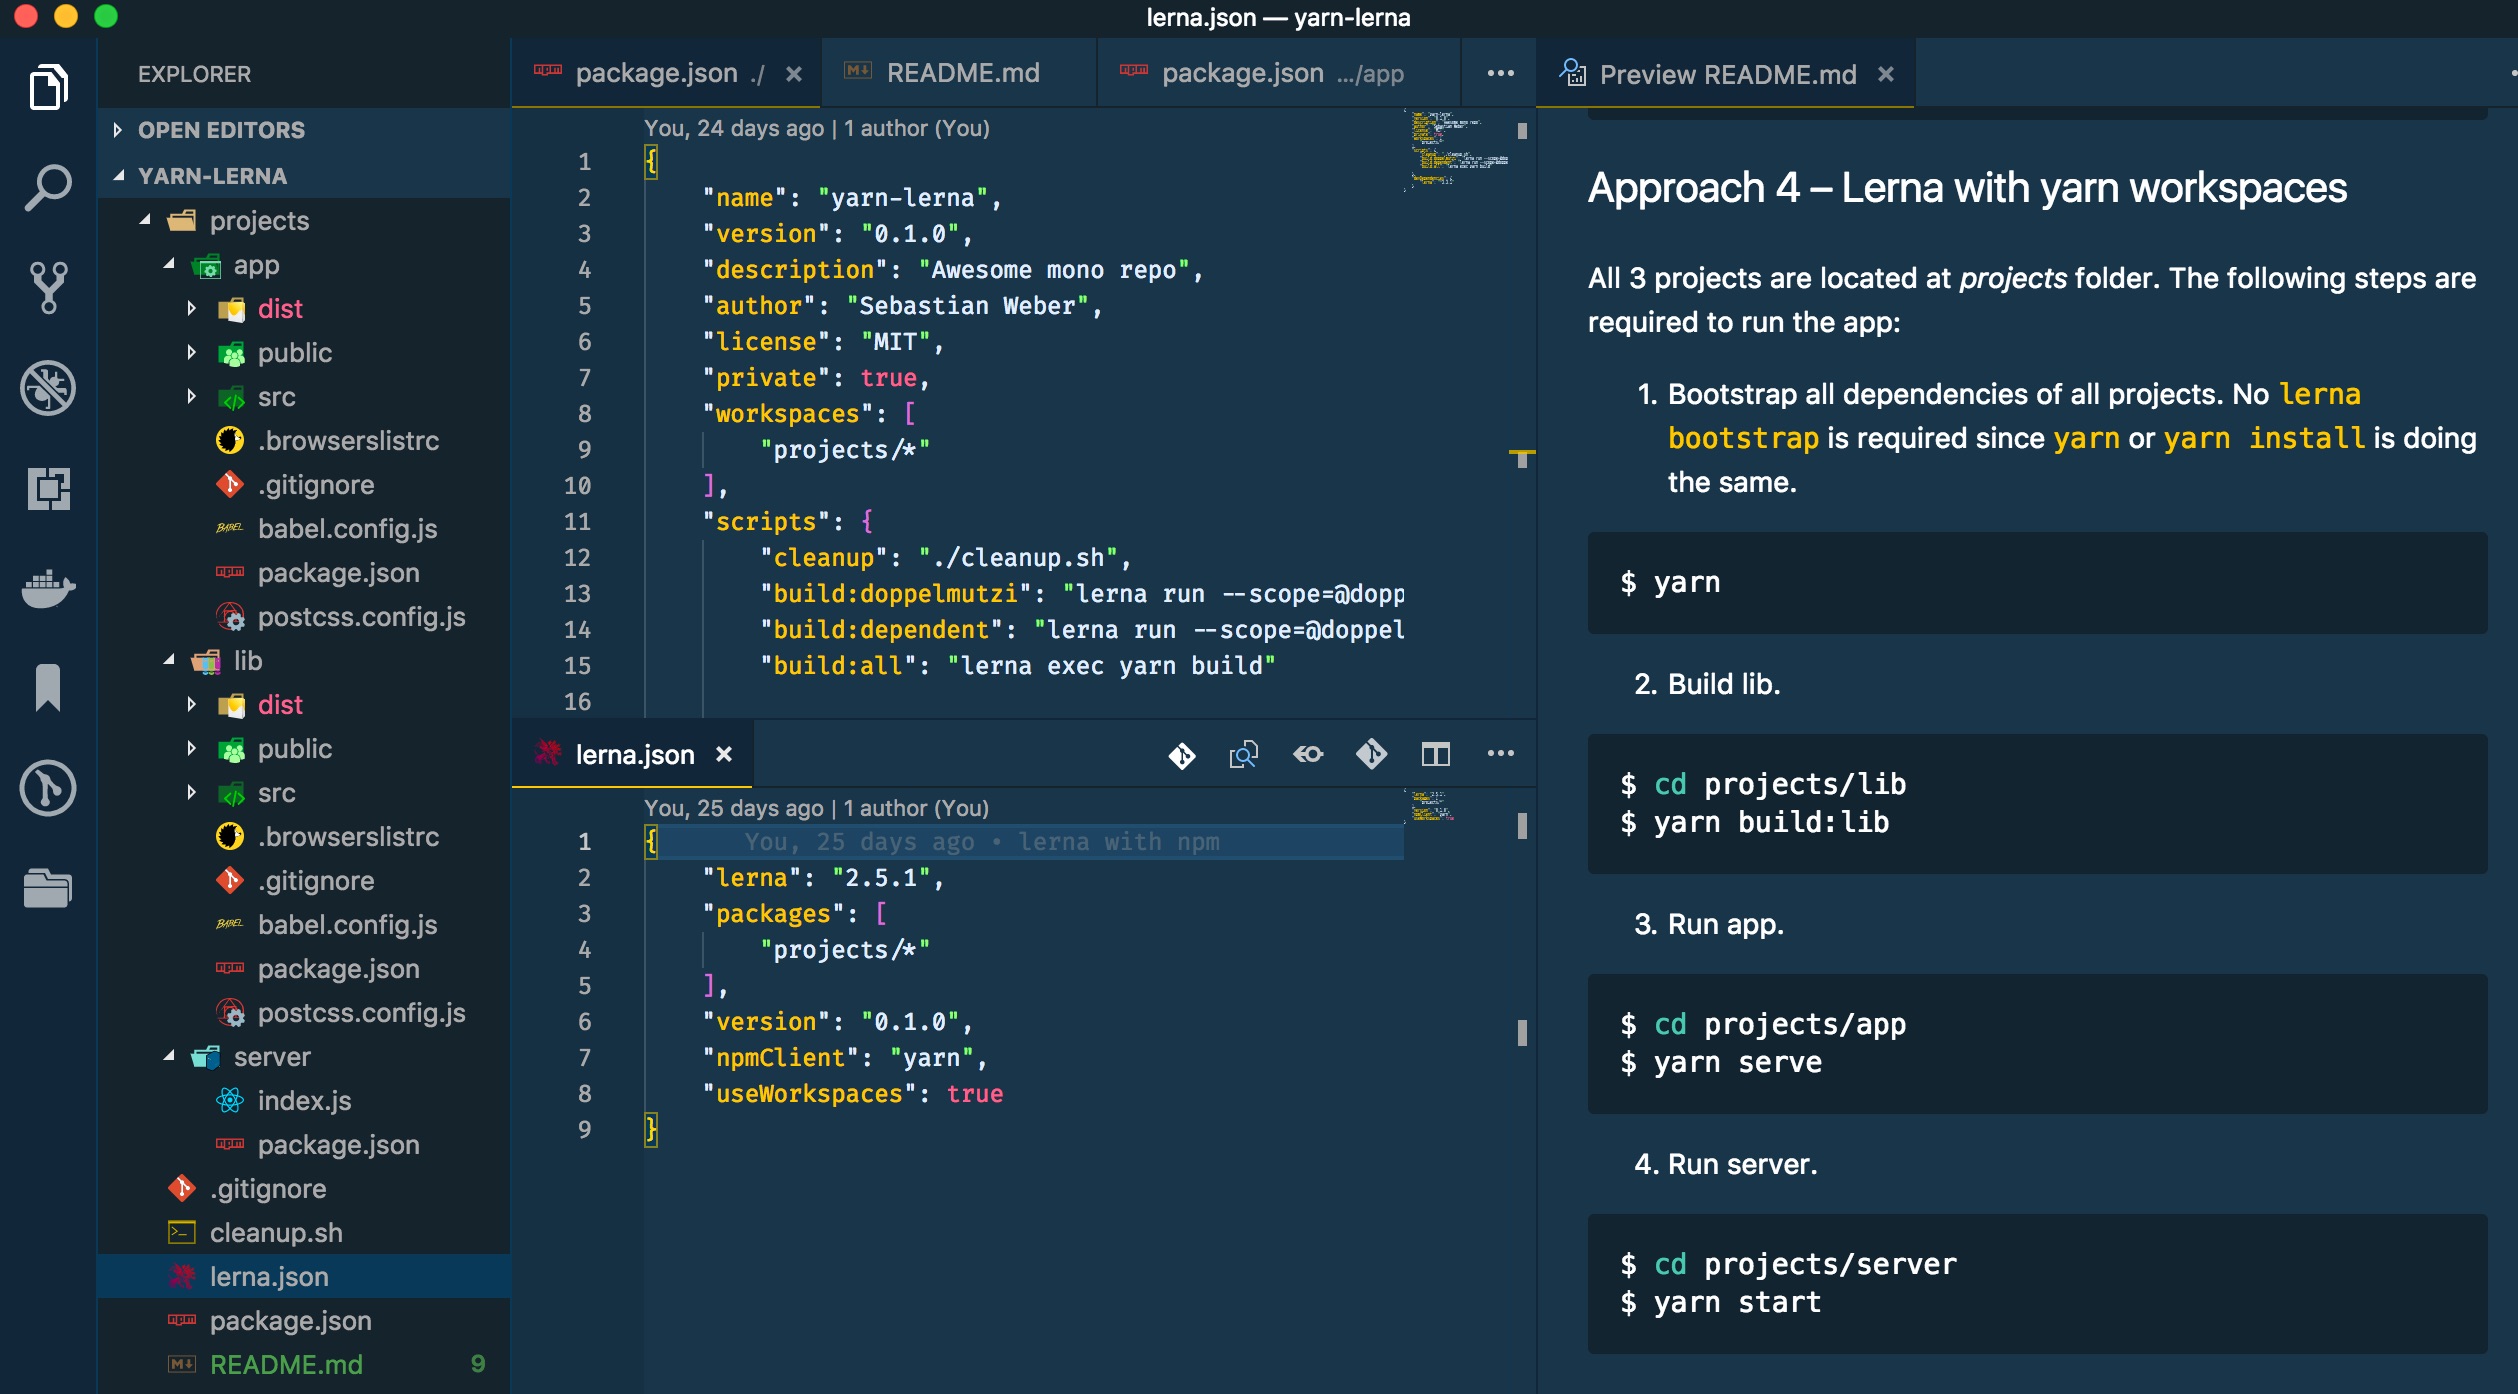
With this setup, lerna completely dedicates the dependency and bootstrapping workflow to yarn workspaces. So, you need to configure more to achieve the same as the previous approach. Why should you then use this way over approach 4? Well, think about this – using lerna and yarn workspaces at the same time makes totally sense. They coexist peacefully together in a Mono-Repo project.
In such a scenario:
- You solely use yarn workspaces for the Mono-Repo workflow.
- You use lerna’s utility commands to optimize managing of multiple packages, e.g., selective execution of npm scripts for testing.
- You use lerna for publishing packages since lerna provides sophisticated features with its version and publish commands.
lerna and yarn workspaces
The last section gives a quick understanding on how to set up Mono-Repos with different configurations. This section’s focus is more on the features of lerna and yarn workspaces.
yarn workspaces
Up to date, yarn workspaces constitutes the only technology that comes with native capabilities for Mono-Repos. In contrast to lerna, you do not have to execute a separate step for bootstrapping dependencies of the packages. yarn install does the trick by installing the dependencies of the root folder and then for every package.
In contrast to lerna, yarn workspaces does not come with additional features besides dependency management for multi-project setups. Since it’s foundation is yarn, you have all of yarn’s features on hand.
For using yarn workspaces, Facebook has introduced a few additional commands that do only make sense in the context of Mono-Repos.
The following command will display the workspace dependency tree of your current project:
$ yarn workspaces info
The next receipt enables you to run the chosen yarn command in the selected workspace (i.e., package):
$ yarn workspace <package-name> <command>
As an example, with the following command react gets added to the package / workspace called "awesome-package" as dev dependency (instead of –dev you can also use -D):
$ yarn workspace awesome-package add react --dev
Up next is an example to remove a dependency from a particular package:
$ yarn workspace web-project remove some-package --save
If you want to add a common dependency to all packages, go into the project’s root folder and use the -W (or –ignore-workspace-root-check) flag:
$ yarn add some-package -W
Otherwise, you get an error by yarn.

With the following command, I add one of my own packages ("awesome-components") to another package ("awesome-app") as dependency. I found out that adding local packages should be done by specifying a version number, otherwise yarn tries to find the dependency in the registry.
$ yarn workspace @doppelmutzi/awesome-app add @doppelmutzi/awesome-components@0.1.0 -D
Using the workspaces feature, yarn does not add dependencies to node_modules directories in either of your packages – only at the root level, i.e., yarn hoists all dependencies to the root level. yarn leverages symlinks to point to the different packages. Thereby, yarn includes the dependencies only once in the project.
You have to utilize yarn workspaces’ noHoist feature to use otherwise incompatible 3rd party dependencies working in the Mono-Repo environment. You have to specify this in the project root package.json as you can see in the following example.
// package.json
{
  ...
  "workspaces": {
    "packages": ["packages/*"],
    "nohoist": [
      "**/react-native"
    ]
  }
  ...
}
For more information take a look at the demo project of ConnectDotz.
lerna
As with yarn workspaces, lerna adds Mono-Rep capabilities to a frontend project. However, as described above, lerna operates on "user land" and cannot add such functionality natively.
If you configure lerna to use yarn workspaces then lerna hands over the whole depenendency management to yarn workspaces. If you configure lerna with npm or yarn then lerna provides the Mono-Repo capabilities on its own by utilizing symlinks. In such a context, you have to use lerna bootstrap to initialize dependencies of all packages.
John Tucker wrote a great article about using lerna’s commands to initialize projects and manage dependencies.
To install react as dependency into all packages, you can use the following command:
$ lerna add react
If you want to install react as dependency only to a particular package, execute the following command:
$ lerna add react --scope my-package
If you have installed react for every package but would like to upgrade/downgrade to a particular version only for a specific package then you can do it like this:
$ lerna add react@16.0.0 --scope my-package
lerna comes with a couple of flags. They constitute options for lerna’s sub-commands that need filtering.
Consider the following npm script called "test". The two shell commands below show how to execute testing only on particular packages by using the –scope flag along with globs. lerna tries to execute yarn test for every package that matches.
// package.json
{
  ...
  "scripts": {
    "test": "lerna exec yarn test“
  }
  ...
}
$ yarn test --scope @my-company-services/*
$ yarn test --scope @my-company/web-*
According to the documentation, lerna also provides hoisting shared dependencies up to the root folder just like yarn workspaces’ default behavior. Therefore, you have to use the –hoist flag.
$ lerna add react -D --hoist
If you use lerna, a question is whether to choose npm or yarn. As you can see with the "cheat sheets" in the last section, you can switch easily between the different package managers just as you like.
Advanced Frontend Workflow Features and Commands
Even if you pick yarn workspaces for dependency management, it is a good idea to use lerna as well. The reason is that lerna provides utility commands to optimize management of multiple packages. For example, with one lerna command you can iterate through all or particular packages, running a series of operations (such as linting, testing, and building) on each package. Thereby, it compliments yarn workspaces that takes over the dependency management process.
Using lerna for testing or linting from within the root folder is faster than invoking all operations manually from every package folder. John Tucker’s blog post deals with testing with lerna in great detail.
Versioning and publishing are important development topics where lerna also shines. lerna allows you to use two versioning modes:
-
fixed/locked mode: The version of each package can be managed at a single point (in lerna.json file). If a package has been updated since the last time a release was made, it will be updated to the new version. As a consequence, a major change in any package will result in all packages having a new major version.
-
independent mode: Package versions can be incremented independently of each other. Therefore, the "version" key inside of lerna.json needs to be set to "independent". This approach provides much more flexibility and is especially useful for projects with loosely coupled components.
You can publish packages that have changed since the last release:
$ lerna publish
In independent mode, there exist different options to affect version bumping with the publish command. In addition to use a semver keyword, you can also utilize one of the following version bump flags: from-git or from-package.
The following command publishes to a npm registry while using the conventional commits standard.
$ lerna publish --conventional-commits --yes
The above command also generates changelog files. According to lerna’s docu, there exist different changelog presets, such as angular or bitbucket. By the way, the yes flag skips all confirmation prompts.
Within lerna.json, you can globally define that conventional commits have to be used without using flags:
// lerna.json
...
"command": {
    "publish": {
       "conventionalCommits": true,
       "yes": true
    }
}
...
@jsilvax explains how conventional commits with lerna works and how it can be enforced with commitlint.
Since versioning and publishing are complex topics, the section above shows only a small sample of lerna’s possibilities. I do not go more into detail because this would go beyond the scope of this article.
Timing Comparison
One of the main reasons why folks stick to yarn instead of npm is performance in terms of time for installing dependencies. Originally, yarn was developed due to the fact that npm took way too long for installing dependencies (besides the fact that npm had lacked some important features). Meanwhile, npm is available in version 6 and has put a lot of effort to eliminate this gap.
Because you can achieve a Mono-Repo in a variety of ways, lets take a look how these different approaches perform. In the remainder of this section, I present the results of my performance experiment. I cloned the Babel project (approximately in October 2018) because it represents a real-life Mono-Repo with many packages (142 to be precise). Interestingly, the original setup of Babel utilizes lerna with a config that specifies yarn as npmClient (no yarn workspaces) and deactivates yarn’s lock file generation.
For every approach (2 – 5) I did the following:
- I changed the configuration required for the corresponding approach (i.e., adapt package.json and lerna.json if required).
- I measured the elapsed time for installation of dependencies and for a dedicated bootstrapping step (if required).
- I measured the time for 3 different use cases. For every use case I performed measurements for 3 times.
The aforementioned use cases (UC) are:
1) I empty npm or yarn cache, I remove all node_modules folders, and I remove all package-lock.json or yarn.lock files. 2) Cache exists, I remove all node_modules folders, and I remove all package-lock.json or yarn.lock files. 3) Cache exists, package-lock.json or yarn.lock files exist, I remove all node_modules folders.
For purging the cache, I executed one of the following commands depending on the used npm client:
$ npm cache clean --force
or
$ yarn cache clean
As a helper for removing lock files and node_modules folders, I added a script to Babel’s root folder called cleanup.sh:
find . -type f -name 'yarn.lock' -exec rm {} +
find . -type f -name 'package-lock.json' -exec rm {} +
find . -name "node_modules" -type d -prune -exec rm -rf '{}' +
Depending on the use case, I eventually commented out the first 2 lines.
For measuring the execution time of the steps for installing and bootstrapping dependencies, I utilized gnomon. The following command constitutes an example for approach 2 (lerna with npm) and UC 1 (empty cache, no node_modules folders, no lock files as precondition) for how I measured elapsed time:
$ npm cache clean --force && ./cleanup.sh && npm i | gnomon && npm run bootstrap | gnomon
Below, you will find the different measurements. I performed these measurements over time, so I have played around with different node, npm, yarn, and lerna versions to find out if different versions have different performance implications.
To switch node and npm versions, I utilized nvm. The following example first installs and uses v9 of node and then installs v5.7.1 of npm.
$ nvm install v9
$ nvm use v9
$ npm i -g npm@5.7.1
Approach 2 (lerna with npm) – Node v10.12.0 / npm v6.4.1 / lerna 2.11.0
| UC | Install | Bootstrap | Overall |
|---|---|---|---|
| 1 | 39.1680s | 64.7168s | 103.8848s |
| 1 | 40.8052s | 78.0730s | 118.8782s |
| 1 | 39.8729s | 64.0626s | 103.9355s |
| 2 | 23.9931s | 34.8695s | 58.8626s |
| 2 | 23.8788s | 38.7979s | 62.6767s |
| 2 | 25.4764s | 37.5166s | 62.993s |
| 3 | 16.7291s | 35.8081s | 52.5372s |
| 3 | 29.4270s | 72.3721s | 101.7991s |
| 3 | 39.4265s | 85.0043s | 124.4308s |
Remark: To be honest, I do not know why the deviations of the last two entries are so high – maybe my Macbook’s workload were too high?!
Approach 2 (lerna with npm) – Node v9.10.0 / npm v5.6.0 / lerna 2.11.0
| UC | Install | Bootstrap | Overall |
|---|---|---|---|
| 1 | 38.1641s | 52.7642s | 90.9283s |
| 1 | 33.3413s | 57.4676s | 90.8089s |
| 1 | 32.3160s | 52.4869s | 84.8029s |
| 2 | 24.3268s | 41.6709s | 65.9977s |
| 2 | 26.4843s | 41.6038s | 68.0881s |
| 2 | 29.8368s | 43.3759s | 73.2127s |
| 3 | 18.2647s | 33.7095s | 51.9742s |
| 3 | 15.2864s | 33.4166s | 48.7030s |
| 3 | 15.9295s | 34.6834s | 50.6129s |
Approach 3 (lerna with yarn) – Node v10.12.0 / yarn 1.10.1 / lerna 2.11.0
| UC | Install | Bootstrap | Overall |
|---|---|---|---|
| 1 | 36.5181s | 58.5693s | 95.0874s |
| 1 | 29.9026s | 53.8042s | 83.7068s |
| 1 | 30.8910s | 60.2566s | 91.1476s |
| 2 | 15.6954s | 34.9247s | 50.6201s |
| 2 | 24.4038s | 36.8669s | 61.2707s |
| 2 | 16.1917s | 36.4996s | 52.6913s |
| 3 | 9.2134s | 29.0799s | 38.2933s |
| 3 | 10.1278s | 27.1641s | 37.2919s |
| 3 | 10.2387s | 28.1842s | 38.4229s |
Approach 3 (lerna with yarn) – Node v9.10.0 / yarn 1.10.1 / lerna 2.11.0
| UC | Install | Bootstrap | Overall |
|---|---|---|---|
| 1 | 52.3567s | 69.5431s | 121.8998s |
| 1 | 45.3363s | 56.1238s | 101.4601s |
| 1 | 40.0621s | 54.2408s | 94.3029s |
| 2 | 23.2312s | 40.1567s | 63.3879s |
| 2 | 22.7905s | 39.2331s | 62.0236s |
| 2 | 21.3754s | 37.9659s | 59.3413s |
| 3 | 13.4165s | 28.6476s | 42.0641s |
| 3 | 13.2283s | 27.9781s | 41.2064s |
| 3 | 12.6465s | 29.3560s | 42.0025s |
Approach 4 (yarn workspaces) – Node v10.12.0 / yarn 1.10.1
There is no "bootstrap" step required because yarn install does this under the hood.
| UC | Install | Bootstrap | Overall |
|---|---|---|---|
| 1 | 34.9199s | 34.9199s | |
| 1 | 31.8336s | 31.8336s | |
| 1 | 32.6647s | 32.6647s | |
| 2 | 17.9583s | 17.9583s | |
| 2 | 17.7032s | 17.7032s | |
| 2 | 17.9703s | 17.9703s | |
| 3 | 12.6103s | 12.6103s | |
| 3 | 13.4137s | 13.4137s | |
| 3 | 12.8213s | 12.8213s |
Approach 4 (yarn workspaces) – Node v11.2.0 / yarn 1.10.1
| UC | Install | Bootstrap | Overall |
|---|---|---|---|
| 1 | 65.1631s | 65.1631s | |
| 1 | 69.0633s | 69.0633s | |
| 1 | 63.1915s | 63.1915s | |
| 2 | 25.6090s | 25.6090s | |
| 2 | 22.4050s | 22.4050s | |
| 2 | 24.7715s | 24.7715s | |
| 3 | 18.0540s | 18.0540s | |
| 3 | 18.8891s | 18.8891s | |
| 3 | 17.0438s | 17.0438s |
Approach 5 (lena with yarn workspaces) – Node v11.6.0 (npm v6.5.0-next.0) / yarn 1.12.3 / lerna 3.8.0
With this approach, I try to find out if using yarn workspaces as part of a lerna configuration makes any difference regarding approach 4. Because there is no lerna bootstrap required, the corresponding column is empty.
But as I have expected, there is no difference to approach 4 since lerna is not involved in the dependency installation / bootstrapping process.
| UC | Install | Bootstrap | Overall |
|---|---|---|---|
| 1 | 60.4779s | 60.4779s | |
| 1 | 63.3936s | 63.3936s | |
| 1 | 58.1888s | 58.1888s | |
| 2 | 32.7976s | 32.7976s | |
| 2 | 30.8835s | 30.8835s | |
| 2 | 28.9111s | 28.9111s | |
| 3 | 16.4637s | 16.4637s | |
| 3 | 17.8068s | 17.8068s | |
| 3 | 16.3400s | 16.3400s |
Approach 6 (lerna + npm ci + Audit) – Node v10.12.0 / npm v6.4.1 / lerna 3.4.3
In this approach I use lerna with npm ci that constitutes an alternative for npm install in a continuous integration context. Starting with version 3 of lerna, npm ci is the default for the installation command. However, you can opt-out.
For this approach, package-lock.json files have to exist. node_modules folders should have been deleted, otherwise you get warnings printed out to the terminal. Thus, UC 3 is not possible.
| UC | Install | Bootstrap | Overall |
|---|---|---|---|
| 1 | 7.9733s | 34.1282s | 42.1015s |
| 1 | 9.3572s | 35.0904s | 44.4476s |
| 1 | 8.9436s | 36.3684s | 45.31200s |
| 2 | 10.8888s | 49.3526s | 60.2414s |
| 2 | 10.9077s | 44.9243s | 55.8320s |
| 2 | 11.5785s | 43.6369s | 55.2154s |
Aproach 6 (lerna + npm ci) – Node v9 / npm v5.7.1 / lerna 3.4.3
Using this exact npm version, the npm ci command is available but without the auditing feature. I wanted to test this setup to find out if there are any performance implications without auditing the dependencies. Again, UC 3 is not possible in this scenario.
| UC | Install | Bootstrap | Overall |
|---|---|---|---|
| 1 | 9.0732s | 29.8326s | 38.9058s |
| 1 | 9.3738s | 30.0418s | 39.4156s |
| 1 | 8.8552s | 29.1426s | 37.9978s |
| 2 | 11.7469s | 39.9573s | 51.7042s |
| 2 | 13.3401s | 44.6026s | 57.9427s |
| 2 | 13.3603s | 39.9416s | 53.3019s |
Conclusion
Based on my measurements, I do not see any notable differences between npm and yarn (workspaces) in terms of performance. From a feature point of view, both do not distinguish either. For me, it’s a matter of taste which package manager to utilize. Futhermore, they can be swapped anytime or used in conjunction.
Currently, I prefer to use yarn workspaces as Mono-Repo technology because I like its hoisting capabilities. On the other side, this is also possible with lerna and its –hoist flag. In my opinion, yarn workspaces with lerna is a good match: Configure lerna to leave dependency management to yarn workspaces and use its utility commands instead.