
Efficient Code Analyzing and Formatting (for Vue.js) with ESLint and Prettier
Please consider my cross-post on Medium. This document constitutes the original version of my article. However, I make improvements only on the Medium article.
Updates
- 02 February 2018 Wes Bos recorded a nice video about setting up Visual Studio Code. I added a small section on his alternative approach for inspiration and trouble shooting.
Lately, I have been investigating quite some time into linting and formatting of JavaScript code for large projects with many developers and diverse set of editors or IDEs. In many projects at work, tools like JSHint, ESLint, or Prettier are all over the place. I realized that I didn’t have a thorough overview of concepts and technologies for static code analyzing and formatting. Thus, I have started to get a better idea on how to establish a robust development workflow that works from within different editors as well as from npm scripts.
Automation is the Key – Improving Productivity
The talk of Chris Heilman at Beyond Tellerrand 2018 at Munich inspired me to emphasize what the motivation behind this article is all about. A main point of his talk is automating things in software projects.
Automation and early feedback are two key points of this article. Professional software projects with many stakeholders involved are complex. Time is mostly a rare good and, thus, development teams should automate tedious, repeatable, error-prone, and boring tasks as much as possible. Thereby, it’s more time for the actual work (and also for the interesting things).
There are many parts in a software development project that should be automated. I do not cover all parts of it, e.g., the crucial concept of automated tests is not part of this article. However, in the following I deal with automating static code analysis with the help of linters in order to find coding problems and inconsistencies as early as possible; it’s best to find them at development time and try to fix them automatically. The same applies to automatic code formatting based on a common ruleset.
I’m convinced that consistent code formatting matters. However, in large project you have different types of developers. There are developers who strive for a consistent, high-quality code base. And there are developers who basically are advocates but are quickly annoyed of linting errors. Those developers are reluctant of manual code formatting. Additionally, there are also developers who have a low opinion on the whole subject (and skip the pre-commit check that triggers linting). With the workflow I point out below, every type of developer is addressed. The goal is to minimize manual tasks as much as possible and thereby increase acceptance.
Agenda
If you are already familiar with ESLint and Prettier you can skip Part I. Jump to Part II if you are interested in setting up ESLint and Prettier to work together. This part also covers how to set this up for Vue.js. Skip to Part III if you want to know how you can use all this (especially with auto-fix on save) in Visual Studio Code and IntelliJ.
Demo Project
In addition to this article, I created a companion project that showcases the concepts and technologies described below.
Part I – The Basics
In this part I go into two very helpful tools to achieve both, finding coding problems and formatting code. If you already have an understanding of ELint and Prettier feel free to skip this part.
ESLint
Jani Hartikainen provides a good comparison of JSLint, JSHint, JSCS, and ESLint, which constitute JavaScript linting tools. In 2016, JSCS has merged with ESLint since both tools were solving similar problems.
Currently, ESLint is the most popular linting utility and is shipped by many starter projects and scaffolding tools. ESLint is a command-line tool that works very well with ES6 and supports JSX as well. It is based on an extensible architecture. As we see later, there exists an official ESLint Plugin for Vue.js in order to provide linting for Single File Components.
Linting rules can be defined within .eslintrc.* configuration files. ESLint supports config files in several formats: .eslintrc.js, .eslintrc.yaml, .eslintrc.yml, .eslintrc.json. The widely used .eslintrc file has been deprecated. Configuration can also be provided as a property in a package.json file.
The following snippet shows an .eslintrc.js file that defines some custom rules with the rules object.
module.exports = {
  root: true,
  parser: "babel-eslint",
  parserOptions: {
    sourceType: "module"
  },
  env: {
    browser: true
  },
  extends: ["standard"],
  plugins: ["vue"],
  rules: {
    indent: 0,
    "no-tabs": 0,
    "eol-last": "off",
    "generator-star-spacing": 0,
    "no-debugger": process.env.NODE_ENV === "production" ? 2 : 0
  }
};
As you can see with the extends array in the previous snippet, ESLint’s extensible nature allows for incorporating 3rd-party rules provided as npm packages. In this example eslint-config-standard is used to incorporate JavaScript Standard Style rules. It’s perfectly ok to override extended rules with custom rules in the rules object.
There can exist multiple .eslintrc.* files in a project. ESLint picks up the file that is located closest to the current file processed for linting. With this approach, a basic .eslintrc.* file can be provided in the project’s root folder. Additional rules can be provided or already defined rules can be overridden in additional .eslintrc.* files. As an example, the following snippet represents an example for a compact .eslintrc.json file that provides configuration for files located in a testing folder. With this setup, ESLint can deal with jest and mocha tests.
{
  "env": {
    "mocha": true,
    "jest": true
  },
  "globals": {
    "expect": true,
    "sinon": true
  }
}
A great feature of ESLint is its auto-fixing capability. With the –fix option on the command line, ESLint makes changes to the linted source code for fixable errors. As we see later, this feature can also be leveraged from IDEs on save that allows for a very pleasant frontend development workflow.
Besides static code analyzing, ESLint also features code formatting capabilities. However, in corporation with Prettier this can lead to problems due to contrary formatting configurations. But it is possible to disable all ESLint rules related to code formatting and use Prettier only for beautifying your code.
Prettier
Prettier is a zero-configuration code formatting utility by design. Its only purpose is to reformat source code; but Prettier does this job well. The main goal of Prettier is to remove all the distractions of writing code by allowing the developer writing code as he likes. Prettier instantly formats the code correctly on save.
It is a relatively young tool that just turned one year at the beginning of 2018. It supports JavaScript including ES2017, JSX, TypeScript, Flow, and also SCSS, and more. Recently, it is possible for developers to add new languages to Prettier with the help of plugins.
Prettier can be integrated with many popular development environments, including Sublime Text, Visual Studio Code, or Webstorm.
A common use case is to use Prettier’s CLI from npm scripts. Therefore, you can install Prettier via npm.
yarn add prettier
In addition, there exists JavaScript API support.
Part II – Bringing the Tools Together
In this part I show you that ESlint and Prettier are a perfect match. However, there are a few things to do in order to utilize them together.
Using ESLint with Prettier
It would be great if Prettier and ESLint would work together hand in hand. And indeed, Prettier is built for integration with ESLint. There exist several ways to achieve such a scenario. However, my concrete workflow intends to use ESLint for static code analysis only and to utilize Prettier for code formatting. Furthermore, I would like to auto-fix (if possible) detected programming errors along with derivations from coding conventions by ESLint as well as violations of formatting conventions by Prettier. This should be possible through running npm scripts manually or by commit hooks. But the most important requirement is to perform all this right in the IDE to hand when the developer performs a save. And all this should also work with Vue.js Single File Components. In the following, I show you how this can be achieved.
With ESLint and Prettier already installed, we need to further install a couple of npm packages:
yarn add --dev eslint-plugin-prettier eslint-config-prettier
The job of eslint-config-prettier is to turn off all ESLint rules that are unnecessary or might conflict with Prettier.
With the help of the ESLint plugin eslint-plugin-prettier we add Prettier as an ESLint rule.
Consider the following .eslintrc.* file.
module.exports = {
  // https://github.com/prettier/eslint-config-prettier
  extends: ["prettier"],
  // https://github.com/prettier/eslint-plugin-prettier
  plugins: ["prettier"],
  rules: {
    "prettier/prettier": "error"
  }
};
In the extends array we utilize eslint-config-prettier to disable all formatting rules provided by ESLint. With the entry to the plugins array, we activate eslint-plugin-prettier that makes the whole process possible: ESLint runs Prettier as an ESLint rule, reports differences as individual ESLint issues, and performs auto-fixing for fixable Prettier violations. With this setup in place, all programming flaws are still detected by ESLint.
The configuration above can also be written in a more concise way to achieve the same goal.
module.exports = {
  // https://github.com/prettier/eslint-config-prettier
  extends: ["plugin:prettier/recommended"]
};
Assuming that ESLint is installed as a local or global npm module, we can provide a lint script for processing all JavaScript and Vue.js files in a package.json file. With the script lint-autofix fixable errors are resolved and written back to the source code file.
{
  "scripts": {
    "lint": "eslint --ext .js,.vue src test",
    "lint-autofix": "eslint --ext .js,.vue src test --fix"
  }
}
With the current setup, *.vue files are not processed correctly yet, but we deal with this later in this article.
With the configuration of the previous .eslintrc.js file, all ESLint rules relating to code formatting are disabled, and only rules that detect patterns in the AST are enabled. However, you might want to have one of the popular code formatting configurations in place, e.g., the config from Airbnb or for JavaScript Standard Style. In combination with our setup, we have to use ESLint plugins that are supported by eslint-config-prettier, e.g., eslint-plugin-standard for aforementioned JavaScript Standard Style. In the .eslintrc.* file, prettier/standard has to be added after prettier to the extends array.
module.exports = {
  // https://github.com/prettier/eslint-config-prettier
  extends: ["prettier", "prettier/standard"],
  // https://github.com/prettier/eslint-plugin-prettier
  plugins: ["prettier"],
  rules: {
    "prettier/prettier": "error"
  }
};
Because of the wide range of possibilities to write .eslintrc.* files, it is not always obvious that the ESLint configuration contains rules that conflict with Prettier. eslint-config-prettier is shipped with a CLI helper tool that checks for any of those problems. In our package.json we add another script named eslint-check to the end of the scripts object.
{
  "scripts": {
    "lint": "eslint --ext .js,.vue src test",
    "lint-autofix": "eslint --ext .js,.vue src test --fix",
    "eslint-check": "eslint --print-config .eslintrc.js | eslint-config-prettier-check"
  }
}
ESLint with Git Hooks
In order to improve the quality of the code base of a software development project, it might be helpful to use Git hooks to reduce defective code getting into remote repositories. In the following, we install Husky that makes using Git hooks easy.
yarn add --dev husky
With Husky in place, we can add Git hooks by adding corresponding npm scripts to package.json. With "precommit" we can add a pre-commit hook that allows us to abort a Git commit if the npm script does return an exit code other than 0, which stands for "successful".
{
  "scripts": {
    "lint": "eslint --ext .js,.vue src test",
    "lint-autofix": "eslint --ext .js,.vue src test --fix",
    "eslint-check":
      "eslint --print-config .eslintrc.js | eslint-config-prettier-check",
    "precommit": "npm run lint-check && npm run lint"
  }
}
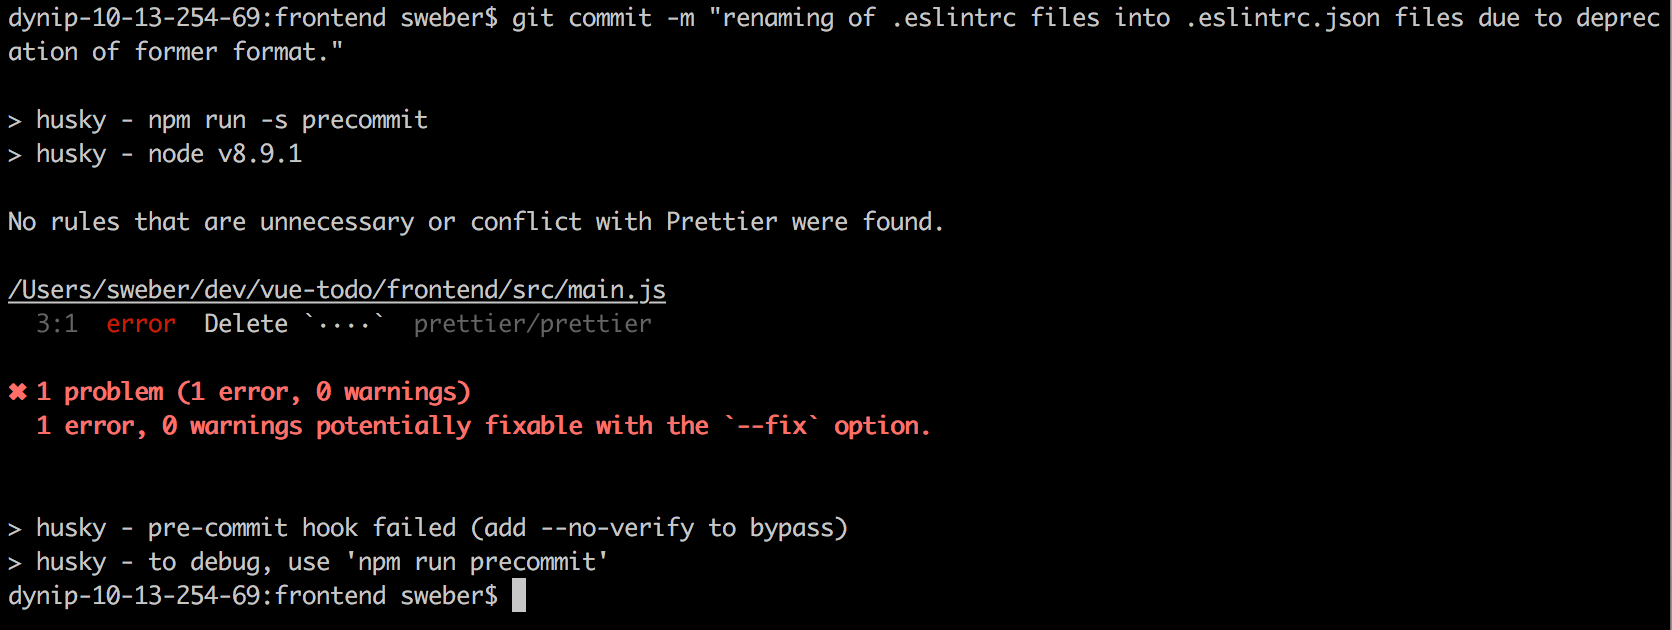
In the previous example, the pre-commit hook prevents committing if the lint check or our actual linting script are not successful. This is a great option to improve development productivity. The next picture shows an example output of a failed precommit script.
Prettier with EditorConfig
What is EditorConfig? It’s a kind of "de facto standard" on formating styles across almost all relevant IDEs and development editors. The main feature is that EditorConfig lets developers set file type specific whitespace rules automatically, across virtually all editors.
This is a good thing in projects where developers have the freedom (and they should have) to choose their tools and editors. EditorConfig addresses a common annoyance that developers introduce source code to version control with different line endings and spaces/tabs settings.
That’s where EditorConfig comes into play. You just have to drop a .editorconfig file into the root folder of your project and put it under version control. Thereby, written source code by anyone with varying editors and platforms will have the same indentation, encoding, and final newline config. Such a config file looks like the following.
root = true

[*]
charset = utf-8
indent_style = space
indent_size = 2
end_of_line = lf
insert_final_newline = true
trim_trailing_whitespace = true

# 4 space indentation
[*.py]
indent_style = space
indent_size = 4
A very useful feature is that is possible to define programming language independent rules but also language-specific rules like for Python in the code snippet above.
The difference to Prettier is that EditorConfig targets at a much more low level. It deals with programming independent text-related things, such as line endings, to use spaces or tabs, etc. Prettier, on the other hand, deals with questions like "Should the starting curly brace of an if statement be on a new line or not?" EditorConfig and Prettier are concerned with different but important things and, thus, should be used together.
Since december 2017, Prettier has been supporting EditorConfig. At time of this writing, EditorConfig respects the following:
- indent_style
- indent_size/tab_width
- max_line_length
Prettier considers a found .editorconfig file on default. Opt-out is possible via CLI parameter –no-editorconfig. However, currently the API does not consider .editorconfig on default but considering can be opt-in with editorconfig: true in the .prettierrc configuration file.
ESLint with Vue.js
Using ESLint with Vue.js means to get it working with *.vue files. This can be achieved with the official Vue.js ESLint plugin named eslint-plugin-vue.
The following .eslintrc.js file shows how Vue.js integration can be achieved.
module.exports = {
  root: true,
  parserOptions: {
    sourceType: "module",
    parser: "babel-eslint"
  },
  env: {
    browser: true
  },
  extends: ["prettier", "prettier/standard", "plugin:vue/recommended"],
  plugins: ["vue", "prettier"],
  rules: {
    "prettier/prettier": "error"
  }
};
With the "plugin:vue/recommended" entry in the extends array, a Vue.js ruleset can be added. With this in place, Vue.js specific rules are used, e.g., enforce valid v-if directives.
In addition to the configuration of a ruleset, "vue" in the plugins array is also necessary for linting *.vue files. Please note, you only need eslint-plugin-vue to lint *.vue files. Before v3, eslint-plugin-vue needed also eslint-plugin-html. I mention this, because a lot of guides and snippets want you to use both plugins in combination and this caused me a lot of trouble to get Vue.js support running. Meanwhile, they are incompatible together.
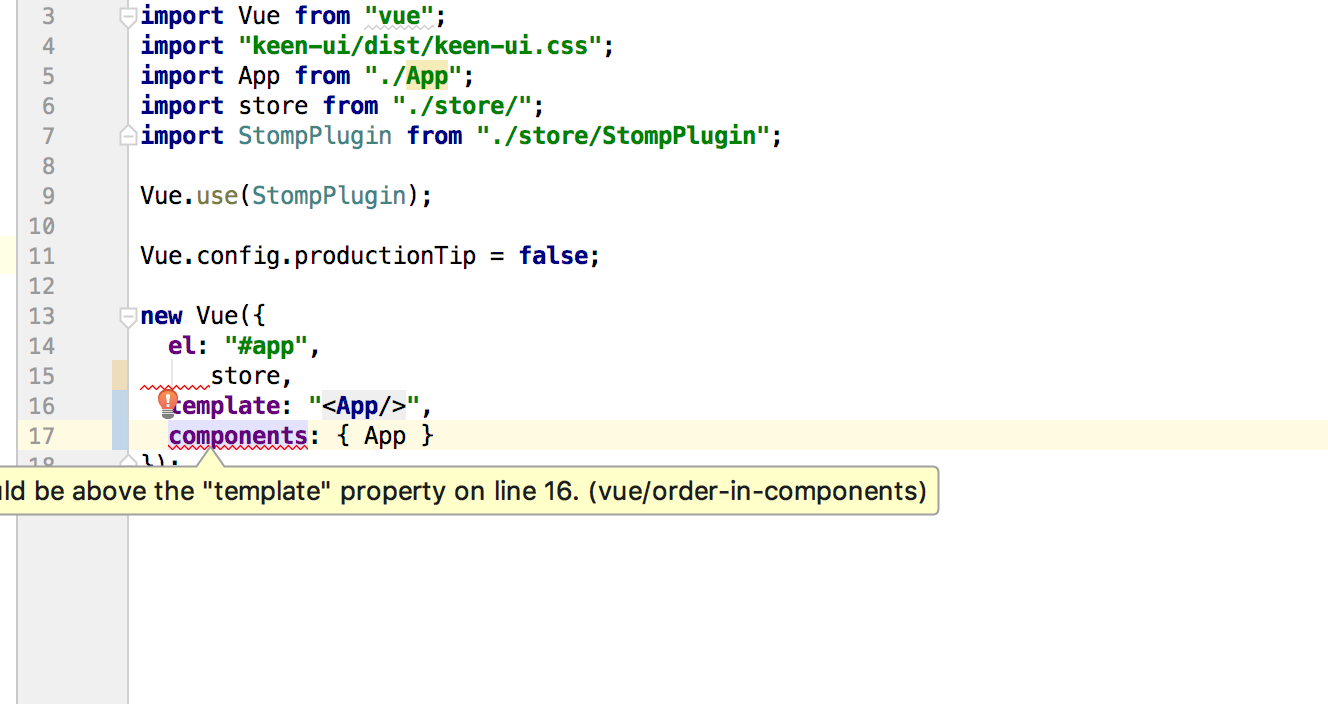
The next picture shows how that Vue.js-specific issues are reported by ESLint by running our npm script.
In this example, the linter issues that property order within a Vue instance is not as recommended.

Part III – Getting Everything to Work in Your IDE
After the tooling is up and running, in this part I go into detail on how to setup coding editors to get the most out of a ESLint and Prettier workflow. I don’t cover many editors but I choose Visual Studio Code and IntelliJ because I use these popular tools at work and I find both very handy. I haven’t tried it but this workflow should be also possible with Atom or Sublime Text.
The main point here is that integration into your programming editor extends the workflow described in part II. There, the workflow has to be invoked from npm scripts; the developer is informed about problems not immediate when he is typing code. Though, editor integration offers the opportunity to perform linting and formatting on typing and saving, respectively. Thereby, the workflow is feasible and leads to a much higher development user experience.
Visual Studio Code
Now, we have everything in place to use ESLint with Prettier and even with *.vue files on the command-line by npm scripts. We have a robust linting and formatting workflow running, which is also capable to auto-fix issues and can prevent committing in case of linting issues. Thereby, we can achieve to have a clean code base in our SCCS.
This is all good and well, but this workflow can be tedious if you have to invoke a npm script and wait for the result. Or even worse, you are in hurry, you have to get your train, and your commit is failing because of linting errors.
Wouldn’t it be better to get immediate response while typing source code in your editor? And wouldn’t it be great to get your code auto-formatted on save for fixable issues? All this is possible with many popular editors.
Below, I show you how to setup Visual Studio Code to get all these things play nicely together. At the time of this writing, Vetur is the best bet to add sophisticated Vue.js support to Visual Studio Code.
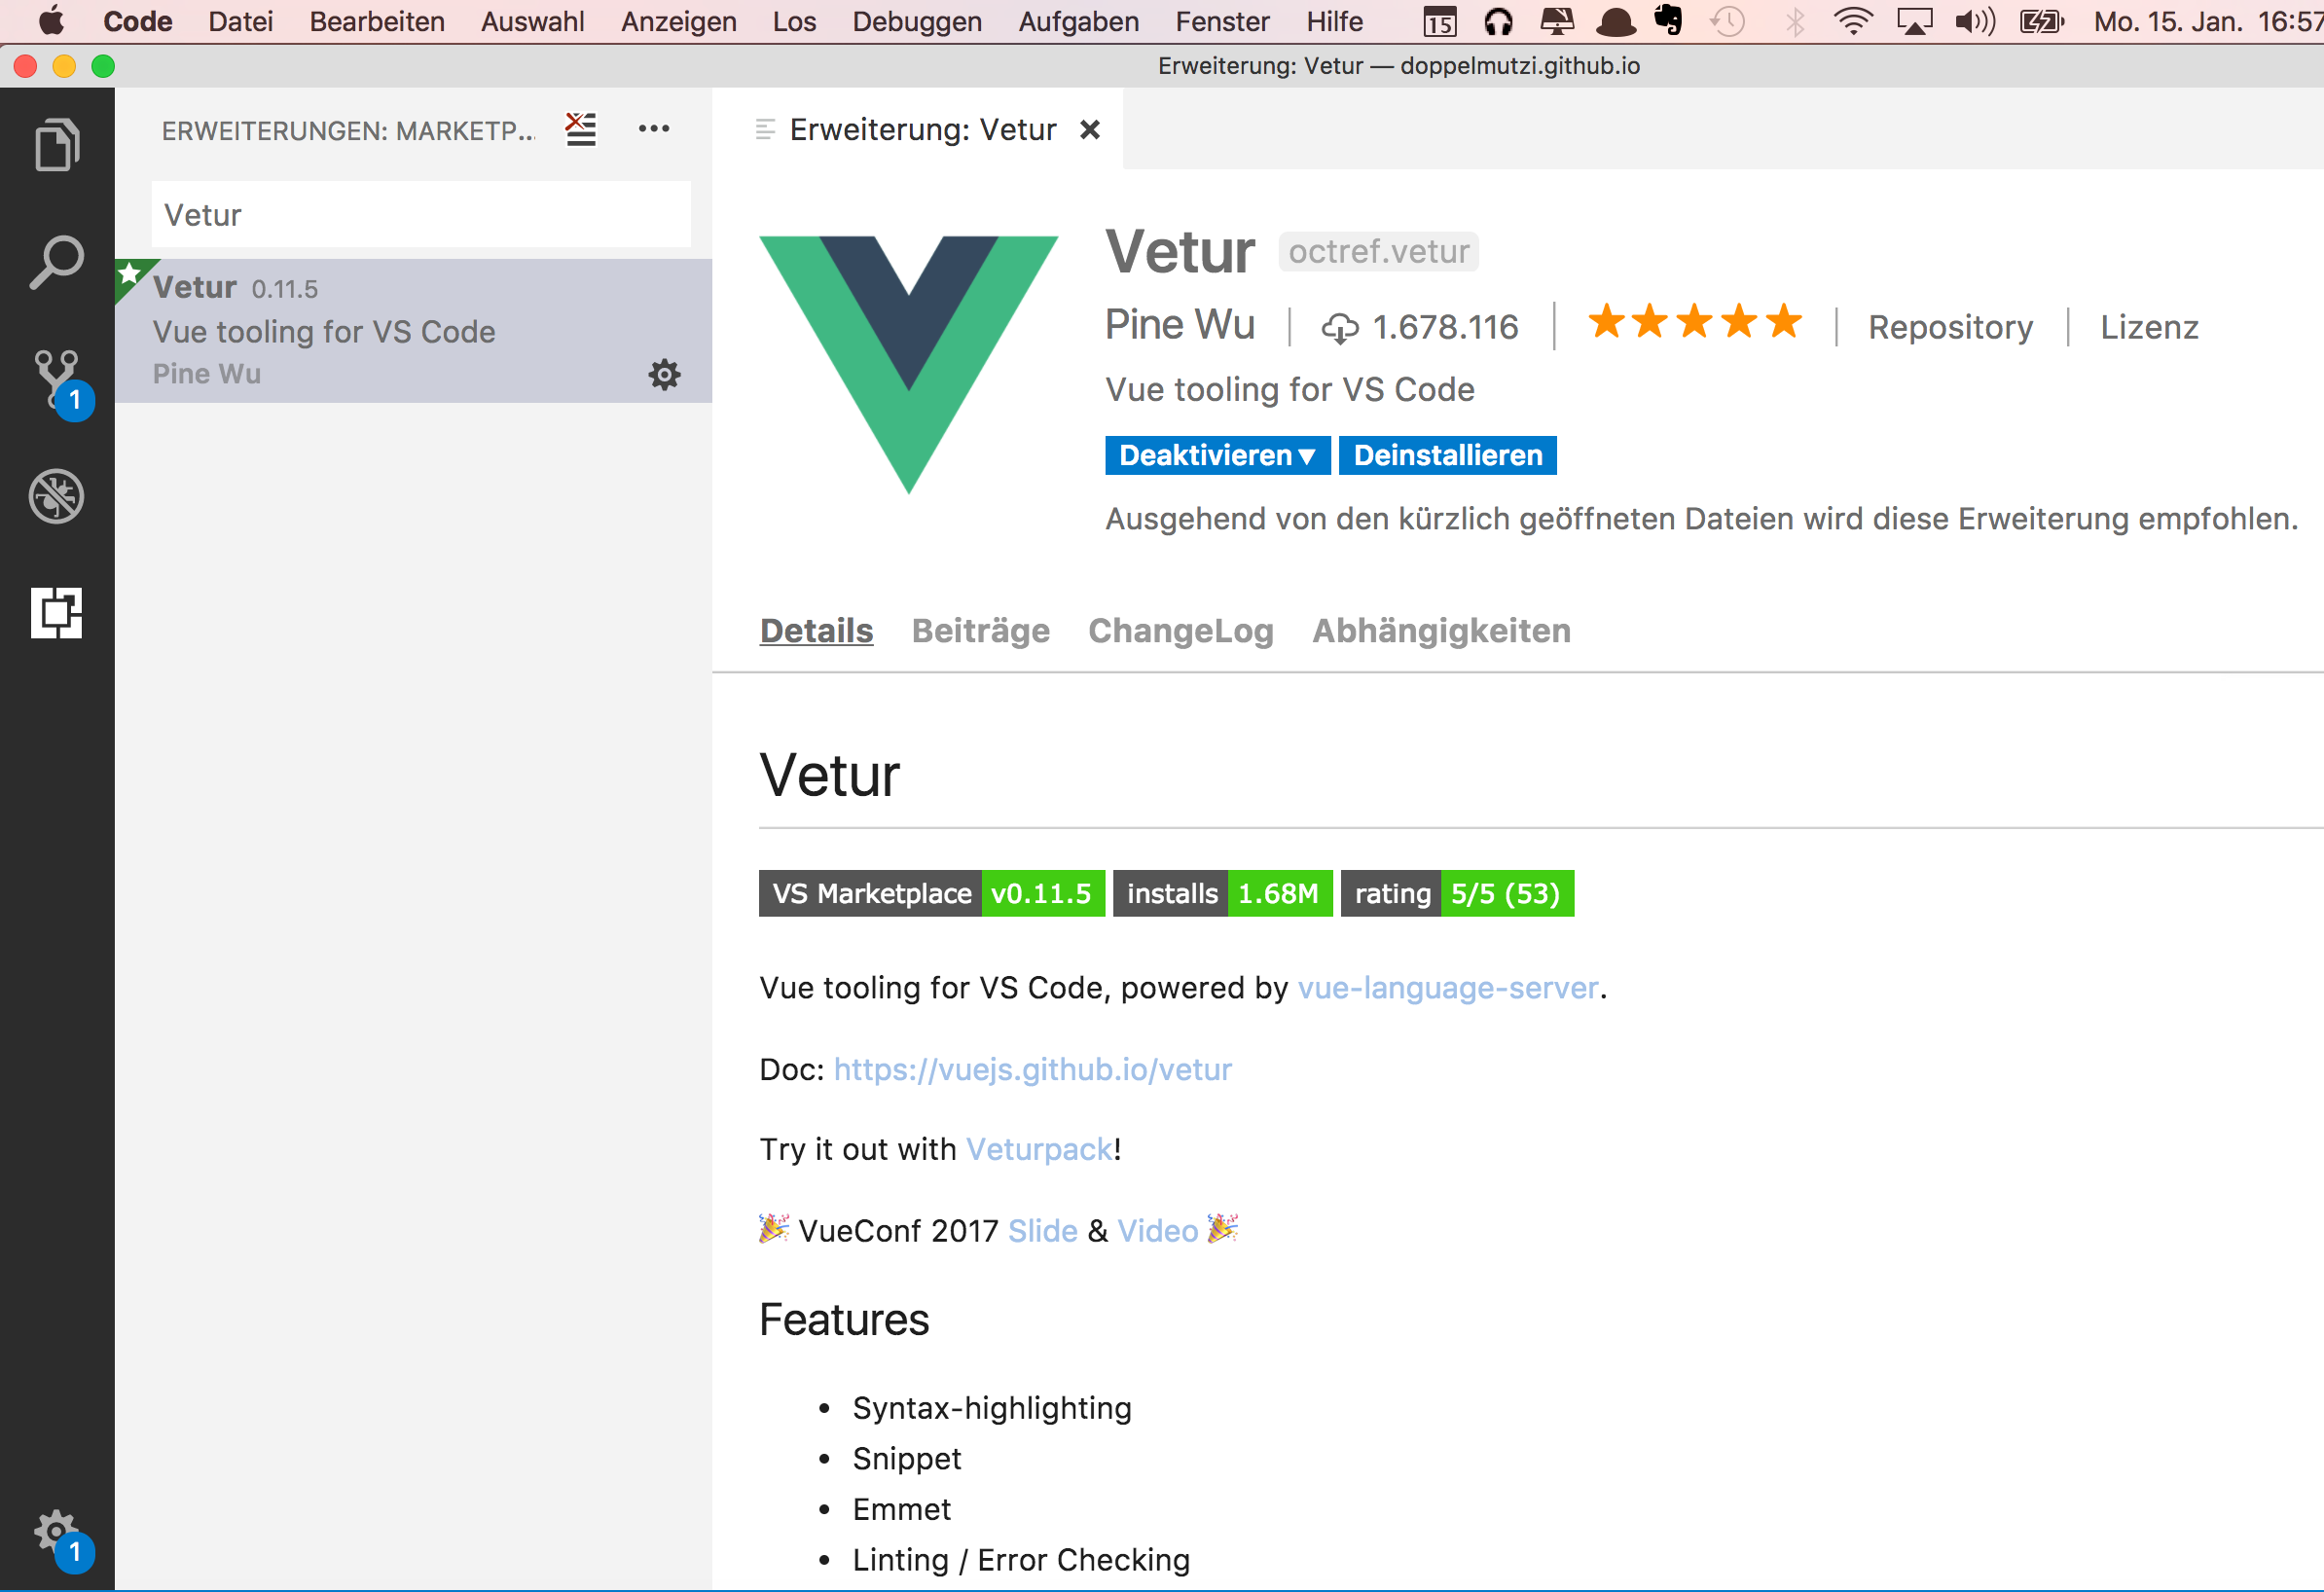
To get a good overview of this extension, you can watch the presentation of Vetur’s author Pin Wu held at the VueConf EU last September.
In addition, you need to install the Prettier plugin as well as the ESLint plugin. Just search in the extension section for the keywords "eslint" and "prettier" and make sure to install the correct ones, from Dirk Baeumer and Esben Petersen, respectively.
Go to Code > Preferences > Settings and setup Vetur to work with ESlint and Prettier. The following snippet shows an extract of the relevant party of the user settings. Consider that the following is a combination of default values and adjusted values and might change with more recent versions of the involved extensions. The configuration below should help you to setup your Vetur extension to work as expected. There are much more configuration properties, just search for "eslint", "prettier" or "vetur" to see all configuration options.
{
  /* ... other options skipped */
  "eslint.enable": true,
  "editor.formatOnSave": true,
  "eslint.validate": ["javascript", "javascriptreact", "vue", "vue-html"],
  "eslint.run": "onType",
  "eslint.autoFixOnSave": true,
  "vetur.format.defaultFormatter.js": "prettier",
  "vetur.format.defaultFormatter.css": "prettier",
  // relevant for 'prettier-eslint' instead of 'prettier'
  "prettier.eslintIntegration": false,
  "vetur.format.defaultFormatter.css": "prettier",
  "vetur.format.defaultFormatter.less": "prettier",
  "vetur.format.defaultFormatter.postcss": "prettier",
  "vetur.format.defaultFormatter.scss": "prettier",
  // at the time of this writing there is no stylus support by prettier
  "vetur.format.defaultFormatter.stylus": "stylus-supremacy",
  "vetur.format.defaultFormatter.ts": "prettier",
  "vetur.validation.style": true,
  // Validate vue-html in <template> using eslint-plugin-vue
  "vetur.validation.template": true
}
In the setup above, automated fixing on save ("eslint.autoFixOnSave": true) is activated. Due to the other options, Prettier is utilized as auto-fixing mechanism. Additionally, with "eslint.run": "true" you as a developer get immediate editor response from ESLint while typing. The last option above is important to get all this working with *.vue files.
Next, you see how this looks in your source code file.
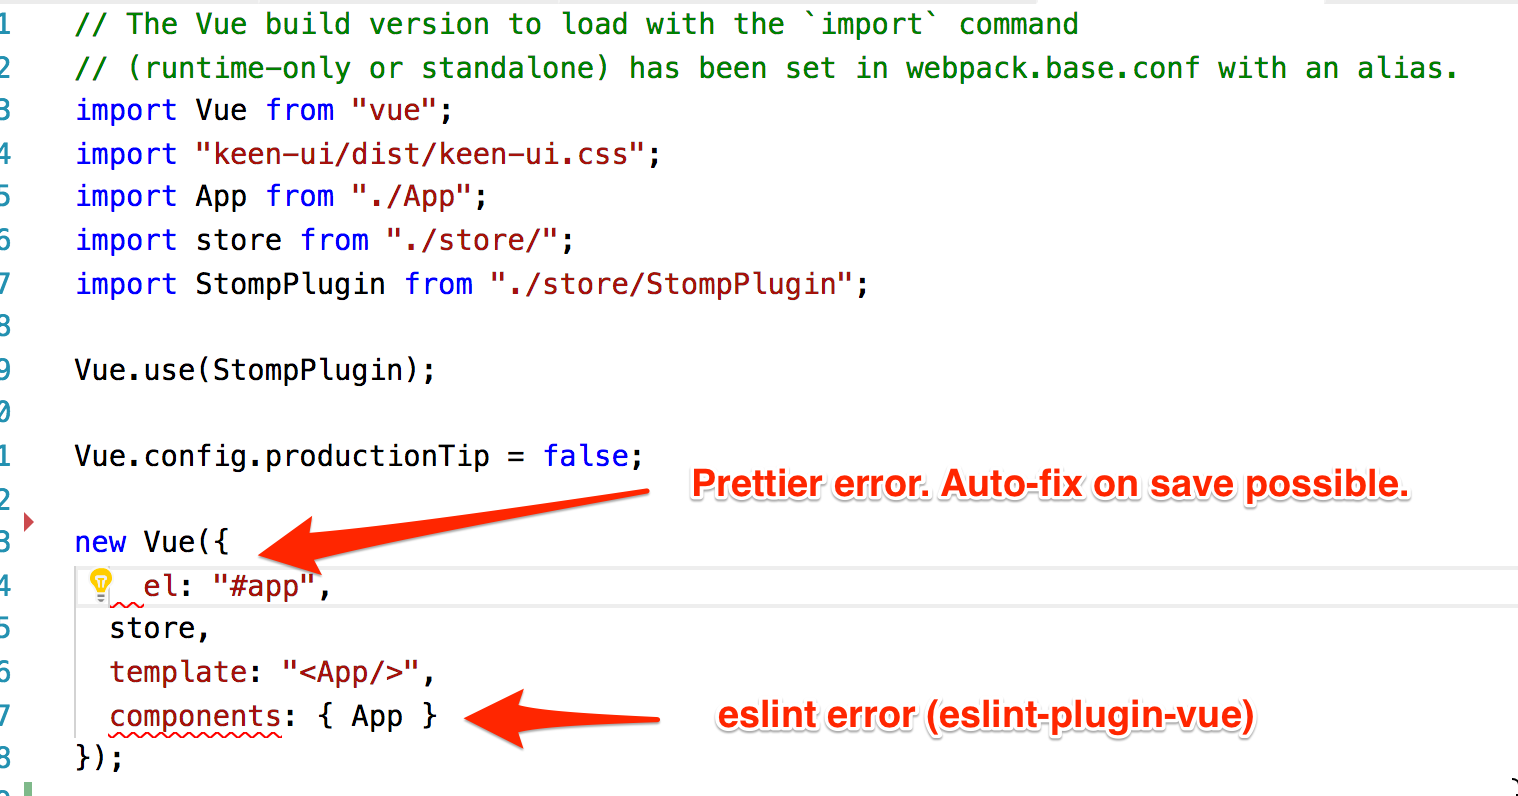
The first issue is a formatting problem that can be auto-fixed by just saving the file. Pretty convenient, isn’t it? The second error is issued by eslint-plugin-vue. Because we put "plugin:vue/recommended" into the extends array, ESLint let us know about a property ordering violation. In this example, components should be placed before template – this issue cannot be auto-fixed by ESLint.
Alternative Approach to Setup Up Visual Studio Code
There isn’t just one way of doing it. Because of so many technologies and concepts that have to used together, it is not easy to get everything working as expected. Therefore, it is helpful to show an alternative way without using the Prettier Visual Studio Code plugin as with my approach above.
Wes Bos tweeted about some problems to get auto-fixing working in Visual Studio Code and came up with a nice solution. He was also kind to record a Youtube video about it. Since I had similar problems during preparation of my demo project, I like to share this.
IntelliJ
In order to use ESLint with IntelliJ you need to install the ESLint plugin. After that to enable it, you have to go to Preferences > Languages & Frameworks > JavaScript > Code quality tools > ESLint and activate it. Then, issues in *.js and *.vue files should be reported by the ESLint plugin.
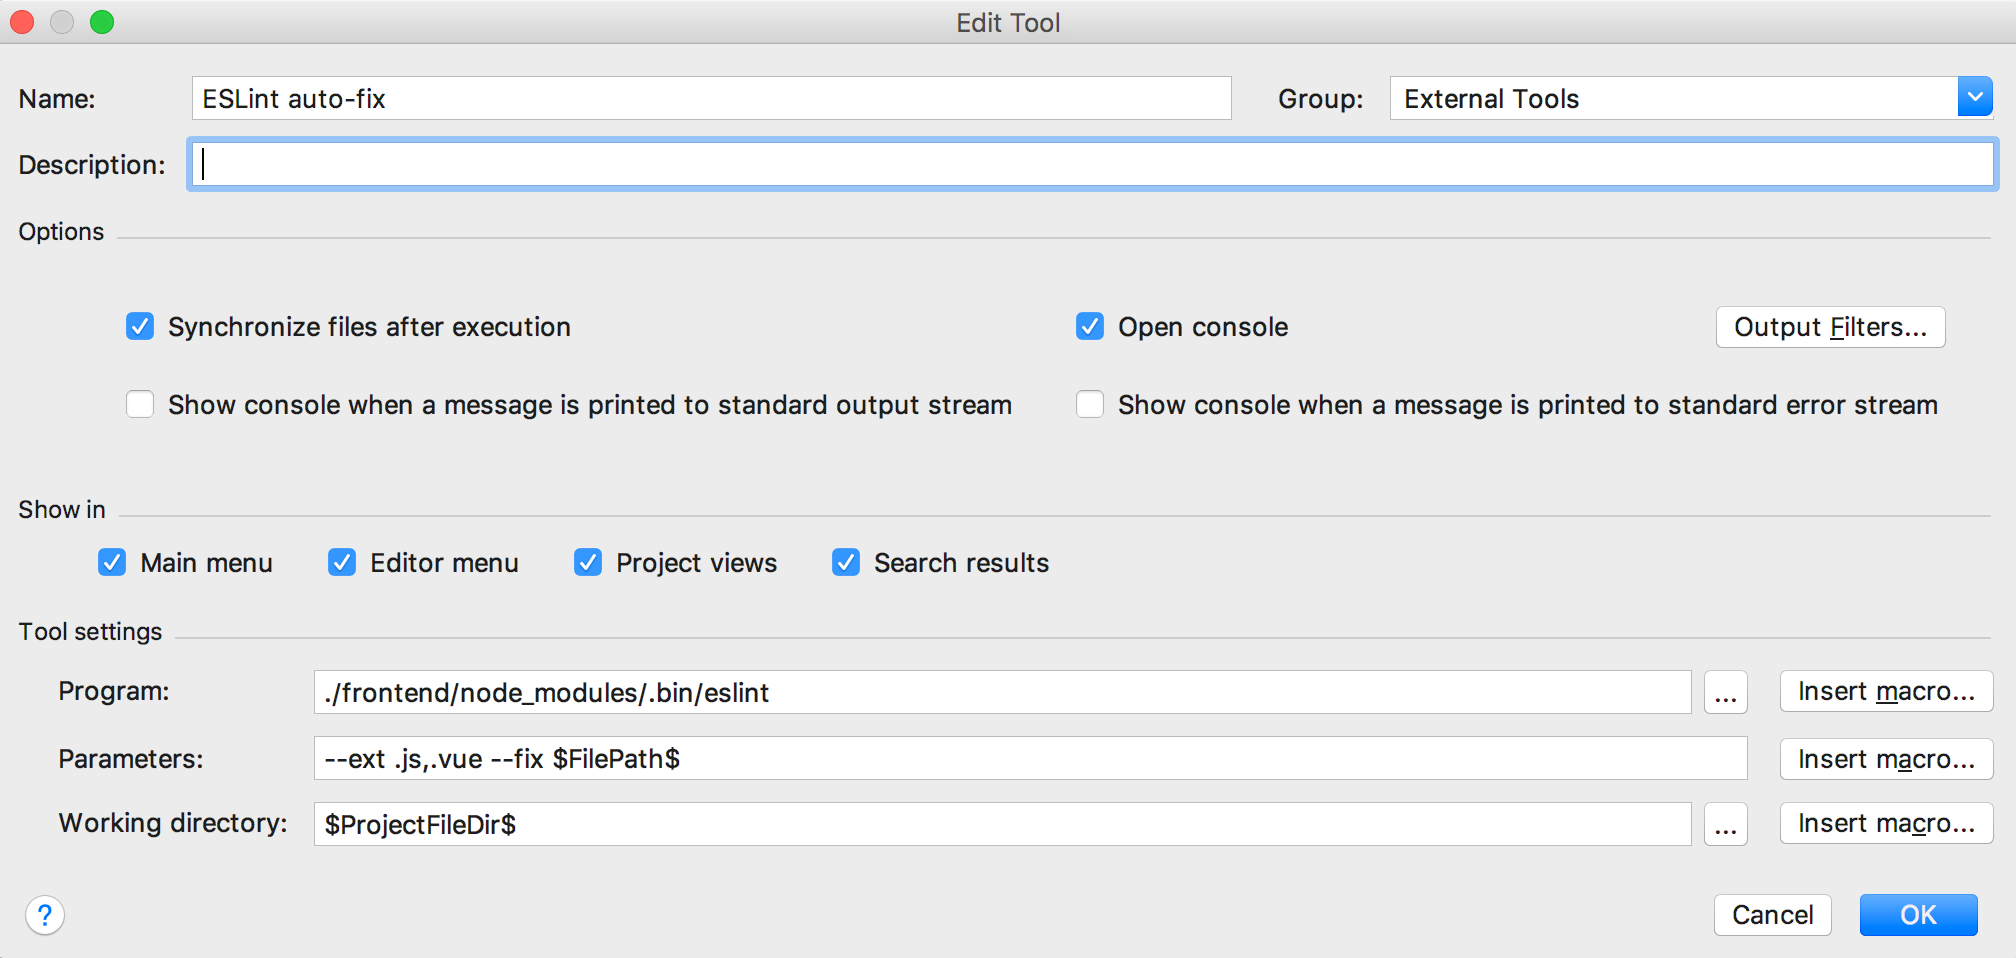
With the setup described in Part II of this articlethat should be all that is needed; except auto-fixing of issues. As described by Jetbrains, one possibility to make this feature (nearly) possible is to utilize a IntelliJ feature called External tools. With that you can run a terminal command on a keyboard shortcut (but at time of this writing not on save). In our case, we want to run a command like our above defined npm script called "lint-autofix". Therefore, go to Preferences > Tools > External tools and add a new tool called "ESLint auto-fix".
In case you have a local installation of ESLint you have to point to node_modules/.bin/eslint in the Programs input field. In the Parameters input field we can use a IntelliJ variable to point to the path of the currently edited file: –ext .js,.vue –fix $FilePath$.
With that, you can test your custom external tool and run it by finding our action "ESLint auto-fix" by pressing CMD-Shift-A.
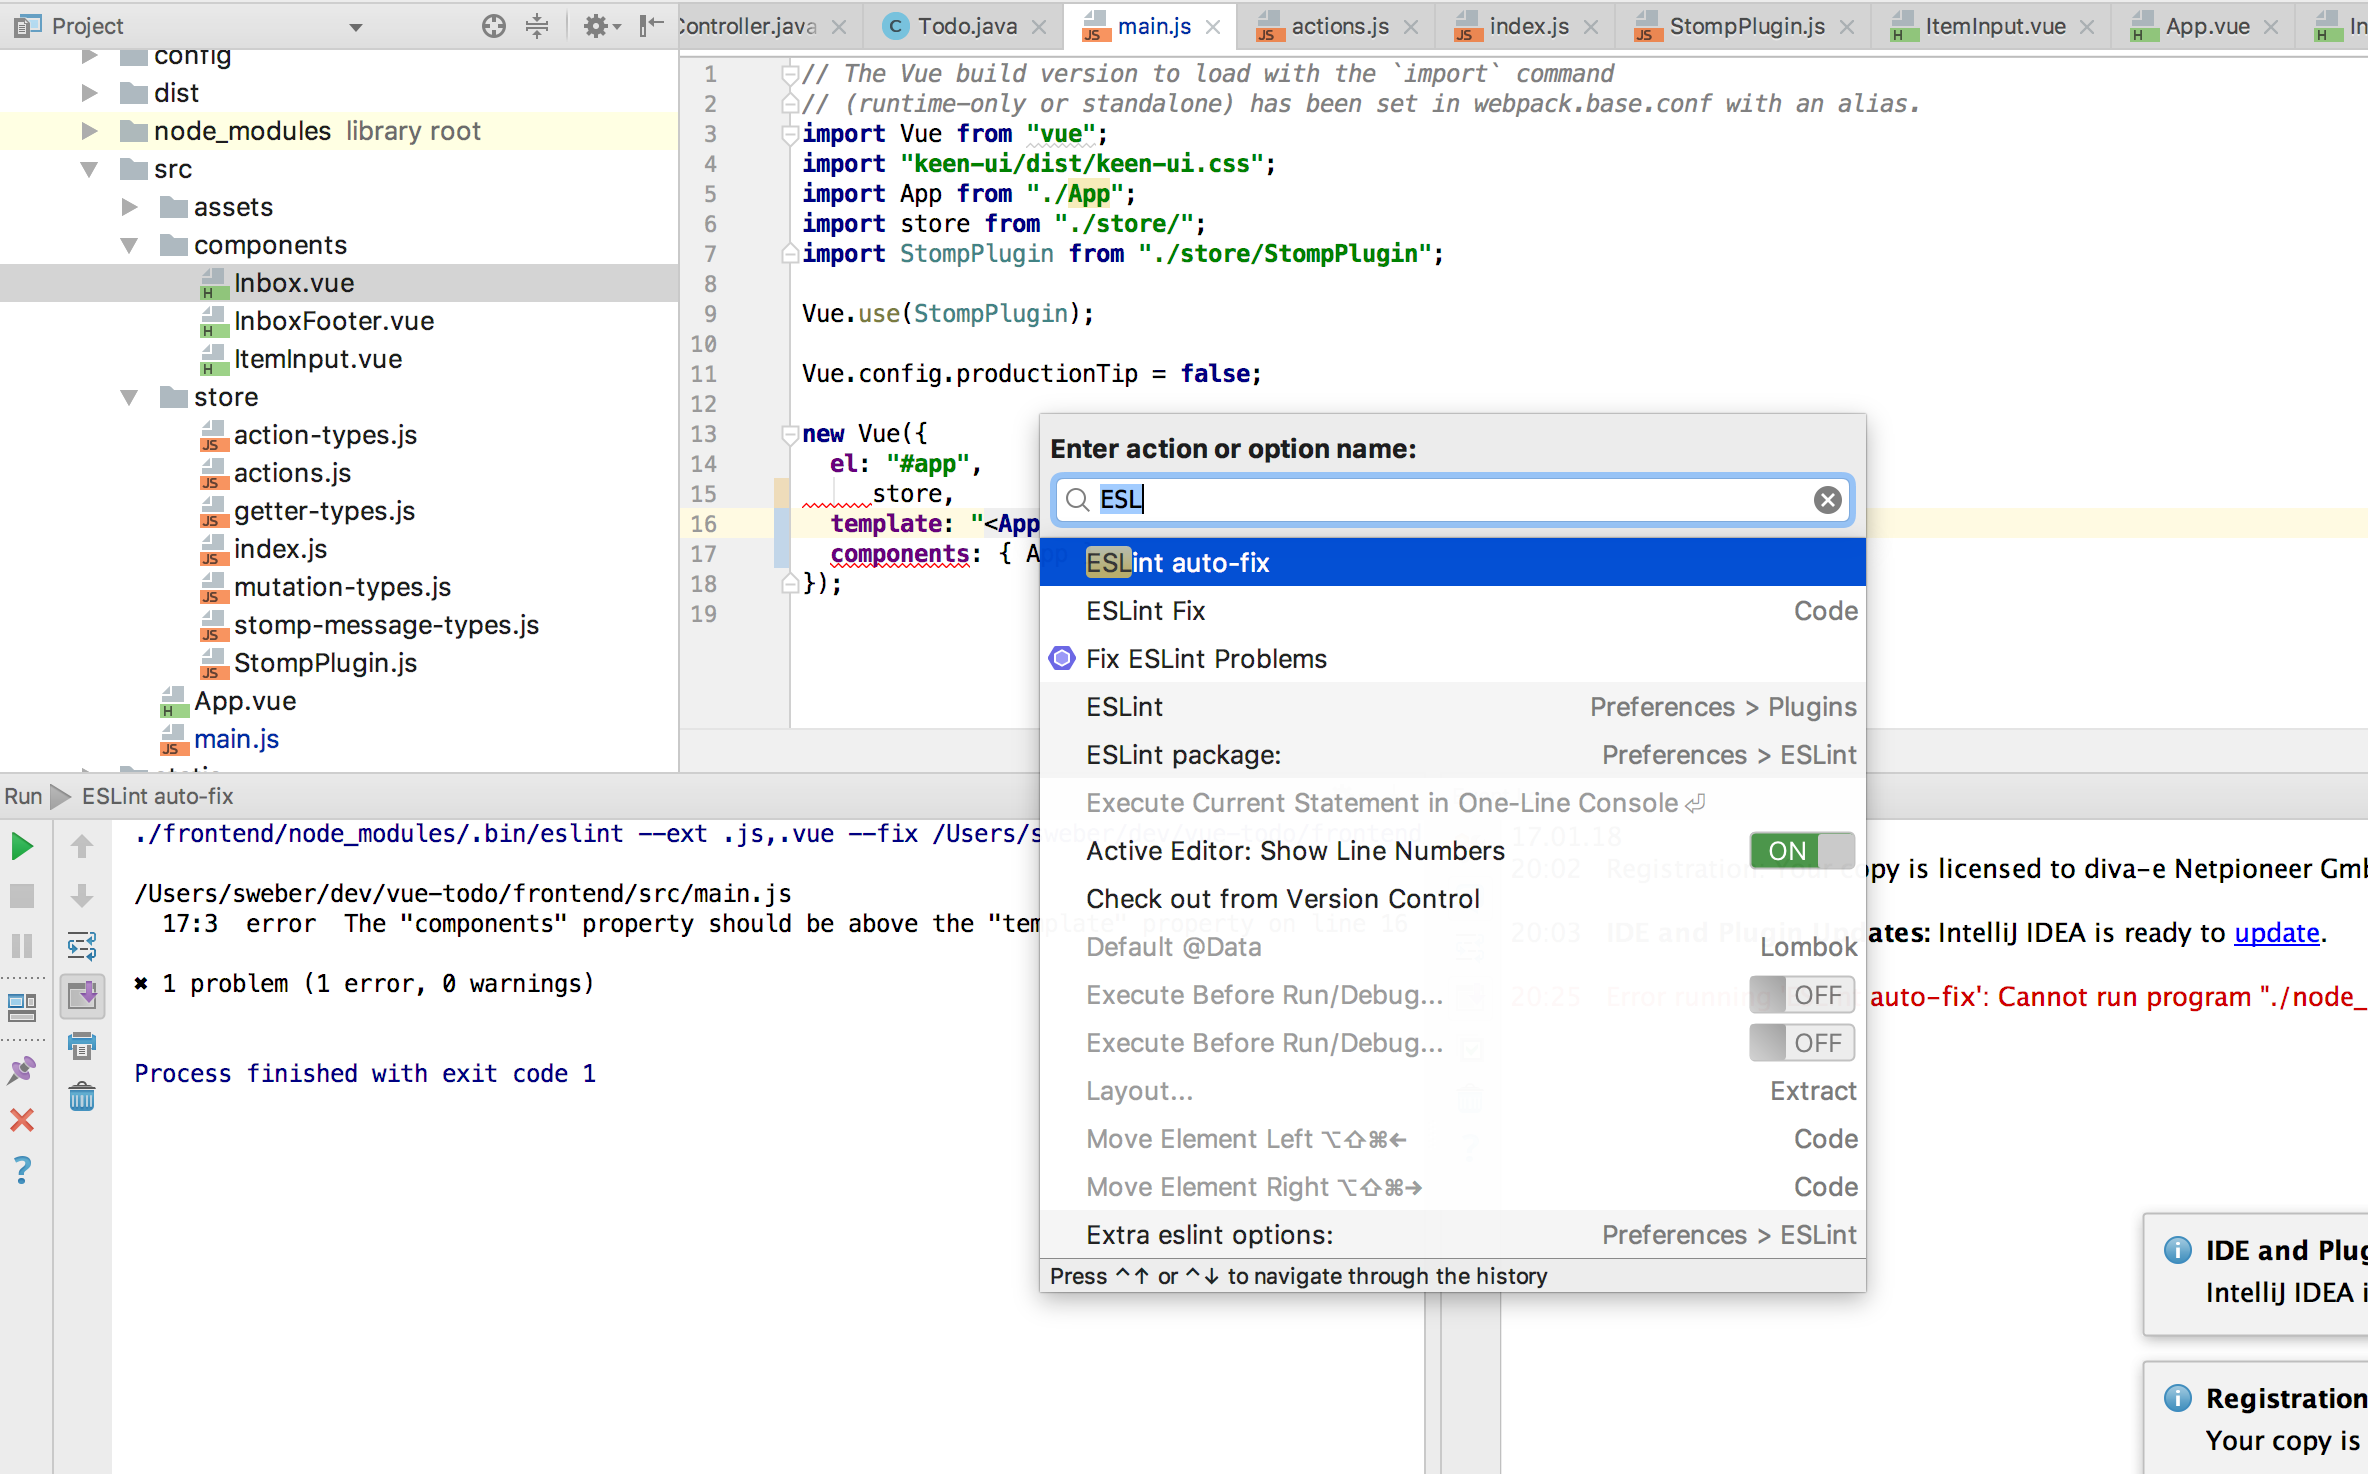
After hitting enter, the script is executed and the first issue is auto-fixed. Of course, the second warning goes away after changing the order correctly.
Final Thoughts
Linting and formatting are two very important concepts to improve code quality. Especially if both are run automatically while you are coding. Early feedback is important – finding issues later in the software development pipeline (e.g., through SonarQube that also performs a static code analysis of your code after pushing it to a repo) can be annoying and maybe harder to fix. Thus, the barrier to deal with the issue right away is much lower if you get immediately informed about issues while you work on your code. In addition, tedious and boring things like manually formatting code according to some project guidelines are most likely ignored. That’s why auto-fixing is crucial.